Being involved in the beauty world, it comes to no surprise that all my friends, family and virtually everybody I encounter, know that I revolve around a lifestyle that most people probably have no time for; that is, everything beauty related. With that, also means I get the few odd gifts from friends; things like fake lashes, lipsticks in shades I would never imagine myself wearing, and of course, extremely budget friendly eye shadows.
Oh my lord, the amount of eye shadows I have received in my life in uncountable, though, none I have received thus far have been anything CLOSE to drugstore. I’m talking about the products you’d find at the dollar store. Things that no beauty would ever THINK to even try. I am however, an experimenter and a person who likes to at least, try and utilize whatever is given to me.
I managed to keep two shadow palettes, so today, I really want to see what a $2 AUD eye shadow can REALLY do.
When I say these are less than drugstore quality, I literally mean they are less than drugstore friendly. These eyeshadows are so cheaply manufactured and made, even drugstores don’t want them. Introducing you guys to the Runway Glamour Eyeshadow Palettes, in the collections Berry Bloom and Blue Magic.
Each palette comes with 6 shades; all are shimmery with small glitters. This means, a general eye look can’t be made with these eyeshadows if you are someone who prefers matte eye looks, or prefer using mattes for eye contouring and definition. I for one, am part of that bandwagon, preferring a semi-matte shimmer at the very least to define the outer corners or shading in the crease.
Before doing anything with the eyeshadows, I took the time to look at what were in my hands, make a quick prayer, re-evaluate my position in life and have the phone ready for when I will admit myself into hospital. I already know how budget eyeshadows, ESPECIALLY ones that aren’t even drugstore friendly, can be weak in pigmentation, chalky looking, crumbly in the pan, full of fall outs and just, ugly in general. Even though I’m hoping that these eyeshadows aren’t to that nature, I am secretly aware that my expectations will become a reality.
Unfortunately (?) my expectations were true. Here’s the arm swatch for reference.
TOP TO BOTTOM using the best of my color descriptions as possible, as these had no names: BLUE MAGIC PALETTE – silver, lavender purple, light aqua blue, dusty turquoise, maroon, navy blue. BERRY BLOOM PALETTE – champagne, muted brick, dusty rose, copper, warm taupe, chocolate.
The blue shadow palette looked pretty in the pan, though they’re all colors I’d never use in my life. Maybe the plum and navy blue, but just those two shades. It also came with a tiny sponge tip applicator which was cute, though I’ll never use it in my life.
The pink palette was just as pretty, and actually had wearable shades, so I was the most excited with this one out of the two. However, I was super upset to see that this palette didn’t even HAVE a shitty sponge tip applicator so that made me real mad. Anthony was mad, then he became sad.
Since I’m dealing with eyeshadows, I decided to try and play around as much as I could while I was putting myself at risk for an eye infection or irritation. For reference, I started off with an already made up base, eyebrows, slight nose contour and highlight. I tried a variety of brushes including Pony Effect, Etude House, Missha and MAC. I ended up sticking with Pony Effect brushes, since they performed the best with these shadows.
Reference: I’m combination sensitive with acne prone skin. I used Sulwhasoo CC cream, Pony Effect Mattifying Blur Powder, Clio Conte de Brow and TCFS Artclass.Starting off with the Blue palette, I applied several layers of the light aqua. Several layers WERE necessary because lack of pigmentation.I used the lavender purple shade on the inner corner and the dusty turquoise on the outer corner. Again, I applied 5 layers.After blending the harsh edges, I topped off using the silver color, which literally did nothing to the eyes. I doubt you can even see anything in this photo, since I couldn’t even see anything in real life.Lastly, to test out the pigmentation, I used the navy blue color to line the eye in a cat shape. I was surprised color could come out since the lighter tones needed several layers for a glimpse of pigment.Onto the Berry Bloom palette, I tested muted brick, dusty rose and copper. All the eyeshadows looked way too similar with each other to distinguish the difference between the three. I decided to stick with the dusty rose shade, applying several layers onto the lid.With the warm taupe, I blocked off the inner and outer corners and blended to remove harsh edges.Again, I doubt you can see, but I used the lightest shade (in this instance, champaign) on the centre of the lid for variation.Lastly, I used the chocolate to line the eyes to test the pigmentation. After using below quality shades, I was taken aback by the chocolate shade even coming out with color.
Overall, the eyeshadows were lacking in pigment, and required a minimum of 5 layers for color to even show up. Since these eyeshadows are all shimmery, it makes the color on the lids even worse, as it makes the eyes more and more glittery, puling away from the color payoff it lacks.
The blue palette applied smoothly with fingers, and the pink did as well, bar the champagne tone, being really chalky and powdery in texture from finger swatches and application. Brush application was even worse, making the smooth texture become really powdery and difficult to apply. The amount of fallout though… don’t even get me started. Oh, BTW I also tried the shadows with a wet brush, and that didn’t do anything. In fact, it wiped off all the shadow I had with my lids. UGH.
To choose my favorite colors from these two palettes wasn’t hard. In the blue palette I really liked the wine and the navy shades respectively. Even though the wine wasn’t as pigmented, it still gave me a light wash of color. The navy was the most pigmented in the palette, and could be used as eyeliner, or as a contour shade for a dark smoky look. From the pink palette, I liked the copper and the dark brown shade. Again, the copper gave me color payoff more than I was expecting, and though the dark brown wasn’t pigmented enough for a strong eyeliner, there was at the very least, color coming off the brush I was using.
Would I recommend? Surprisingly, yes. I started off with Missha cosmetics, since Missha was the only K-Beauty retailer here in Perth at the time, other than The Face Shop, which was out of my way to go to. Since I applied makeup inexperienced, I had no clue what the hell I was doing, and ended up wasting products because I thought I was doing everything correctly.
For a beginner, these eyeshadows aren’t going to blow out your budget at all, have colors you can experiment with and being that these shadows aren’t strong in pigment, means you’re not going to leave the house looking horrendous; well, not as bad as I would have starting out with makeup. If you at the very least know your way around makeup products, then you can skip this recommendation because these shadows are shit.
If you enjoyed this post, don’t forget to like, subscribe to my blog and share with your friends and family. Have you tried low quality makeup products before? Did your face burn off in the process? Let me know down in the comments below, or through my SNS, which you can find below.
The last post I made seemed to be popular, so I wanted to do another product empties post again. I was really upset, because I actually lost half of my products when I was cleaning out my stuff. I must have mistaken the empty bottles for trash and threw them all straight in the bin before I could take any photos of them, so unfortunately for me, I wasn’t able to get photos of my La Mer soft cream, the Creme de La Mer, POLA Grand Luxe, Albion Skin Conditioner, Sulwhasoo First Treatment Essence, Clinique Moisture Surge cream, Laneige Lip Sleeping Mask or The History of Whoo Whitening Ampoule set.
Nonetheless, I did manage to keep some items and so I will be talking about them here. Prepare yourself for ugly photos, dirty bottles and blurry pictures, because I am a professional blogger after all.
SKINCARE
ALLIE Sun block
I mentioned this product many times, and I believe that I did include this in my last empties post. I did end up repurchasing another 2 bottles, which both are now completely used up. I really love this sunblock as it has SPF 50 PA ++++, it’s light weight, absorbs nicely into the skin, gives slight white cast that appears natural on my skin and it’s wearable under makeup. The only problem I encountered with this sunblock is that locally, the prices were initially only $49.95 AUD, but with our ever declining market and dollar strength, prices for this baby are sitting at an average of $55 per bottle. Sure, the price was steep to begin with, but now I’m starting to feel it’s a bit ridiculous.
Would I repurchase? Probably, once the price stabilizes again, otherwise I might have to look for another sunblock that performs just as well as this one (which I can easily find because Allie UV blocks are comparable to Kanebo’s UV Milk/Gel and Innisfree’s Eco Safety IMO).
KOSE Speedy Cleansing Oil
A cheap spend, and a decent oil cleanser. Honestly, when it comes to cleansing, I don’t really care what product I use, provided it does the job effectively, is pH balanced suitable for the skin, and it is easily accessible to me. It’s very rare I stick to one brand of cleanser or cleansing oil, since I generally don’t care about it too much.
This cleansing oil isn’t an exception to my feelings of cleansing. It does the job very well, it’s gentle on my skin, breaks down makeup and emulsifies easily. I can’t really fault it at all, and it’s pretty cheap as well.
Would I repurchase? Sure, if this is the cheapest oil out in the AB market. Otherwise, I’d just go for the cheaper option, if there are any.
MANDOM Bifesta Cleansing Wipes – Bright Up
These have been a GOD SENT product. You guys know I absolutely DESPISE cleansing wipes, but these ones are enriched with the same liquid found in their micellar water, so I’m never worried whenever I use these sheets. I even wrote a whole blog post about them, which you can read about here.
Would I repurchase? I try not too, only because having cleansing wipes at the disposal can encourage laziness when it comes to skincare, but everyone knows that I’ll end up grabbing another package eventually.
MANDOM Bifesta Cleansing Lotion
Here starts the blurry photos.
Just like the wipes, I wrote a whole blog post on this product, so you can have a read of it here.
Would I repurchase? I like this micellar water, but I do prefer the Acne specific one from this range, so not necessarily repurchase the moist version, unless the Acne specific isn’t available. Actually, let me rephrase this.
I would repurchase depending on stock availabilities, in this order:
Acne Care
Bright Up
Moist Up
Q10 Enriched
So, to clarify, if the Acne Care isn’t available, then I would repurchase the cleansing water in the Bright Up formula and so on, so forth.
HELLO FACE Milky Drop Cream
Remember that DoctorCos branded cream I talked about ages ago? This utilizes the same droplet technology where the cream produced liquid droplets upon application to provide extra hydration for the skin. I found that this cream was a bit harder to absorb than the DoctorCos cream, but provided the same level of hydration as the DoctorCos.
Would I repurchase? Since this cream provided my skin with whitening care, that helped with hyper pigmentation, I would say I might repurchase it, since whitening care is so damn expensive. Otherwise, I’m inclined to go for different creams since there are better alternatives to this one in particular.
SECRET KEY Snow White Essence
I heard about this product back when I was working customer service in cosmetics retail, from a Muslim customer who only shopped skin whitening products. She basically told me this was THE product to help brighten the skin, and really stop your skin from getting darker. Since, back then, my peers and a few customers made me feel uncomfortable with my skin tone, I went out and bought a bottle to really “fix” my skin tone.
To clarify, I actually like my skin tone now; I think dark skin, light skin and everything in between are equally beautiful, and for me to think otherwise back then, was a bit stupid. Nonetheless, this is truly an example of how peer pressure or even bullying (if you can call it that) can affect someone’s mental state.
Back to skin care, I used this bottle hoping for a whiter and “more beautiful” me, but this bottle did absolutely nothing other than make my skin appear overly compensated with sebum.
Would I repurchase? HELL NO.
LEADERS INSOLUTION Wrinkle-Tox First Ampoule Mask
I was planning to do a separate blog post on this mask alone, but I lost my photos when I was doing my monthly clean out of images in my phone. Mistakingly, I deleted the mask images along with older blogging content that has already been published, so there goes my hard work down the drain.
Oh well.
As far as this mask goes, it was in this vial-like bottle seeped in serum and wrapped around a stick. The whole mask and design aspect itself was very interesting and nothing like I’ve ever seen before. Using the mask however, my skin was itchy and red upon application, and remained red for the rest of the day. The morning after, my face blew up with pimples.
Would I repurchase? Oh my god yes. I love getting allergic reactions and pimples all over my face.
if you can’t tell this is sarcasm, then you need to turn your locations on so we can chat.
ETUDE HOUSE Dust Cut Facial Mist
I don’t know why I bought this facial mist to be honest, but all I can remember was that the bottle was retailed for $35 AUD. Now, I’m not sure about you guys overseas, but here in Australia, Etude House is NEVER above $30, no sir. I say, that even though I don’t find it expensive at all, if you’re going to purchase a drug store branded item, then you’d expect to be paying drug store prices, right?
Overall, the mist itself was ok, albeit a bit dry on the skin. I mean, it’s to be expected if your mist claims to “cut the dust”.
Would I repurchase? Not at that price. Otherwise, I might get me another bottle.
AVENE Eau Thermale
AKA canned and compressed water.
What is there to say, other than Avene is EXPENSIVE here in Perth, and that it literally is water in a mist can.
It’s good for sensitive skin. BECAUSE IT’S WATER!
It helps to smooth and soften the skin. BECAUSE IT’S FUCKING WATER!!!!!!
Need I say more? Oh BTW I got the largest size and spent $59.95 AUD on it, so other than it being just a can of water, it’s also ridiculously priced. Who in their right mind is OK with spending close to 60 bucks on a can of water?
Would I repurchase? I’m notorious for spending and wasting money on unnecessary shit, but this is a bit too much. I’d rather buy a carton of carbonated water and use that as bathing water, than to repurchase this facial mist.
INNISFREE Jeju Volcanic Pore Clay Mask
Cult favorite, my favorite. I have a Whoo clay mask that costed me a whopping $90 that honestly, performs less than what this mask can offer, and the Innisfree only cost me a quarter of the price. It’s a clay mask, it tightens, softens the skin, brightens the complexion AND it tightens pores. Needless to say, everyone can get their hands on it.
Would I repurchase? Of course; it’s cheap, effective, and it lasts a long time.
CLINIQUE Smart Treatment Oil
This is the beginning of dirty packaging as well.
I was pressured by the staff there to purchase a bottle. She literally made me feel like shit, left tissue paper tearing all over my face after I received a facial over there, and disregarded the fact my skin was literally burning when she applied not only a clay mask I’m allergic to, but also a toner that literally causes my skin to bleed. That stupid bitch made me look bad, feel bad, then came and said a few words that would have had me permanently removed from the shopping centre if I didn’t buy this oil. I was absolutely FUMING, but I couldn’t have myself permanently removed; I worked INSIDE the centre.
I bit my tongue and purchased the damn oil. What else could I have done? Sure, I could have told a few people and got them to help me out, but with no solid evidence, it would be word for word. A formal complaint written in handwriting would also have done nothing. Calling the store manager on her pasty ass? Again, word for word. Ain’t there a single thing I could have said or done to fix the issue.
Nonetheless, that’s in the past and I was stuck with a facial oil I didn’t really need. What did I think of it? Well, it was an oil, and it went on my skin. It absorbed terribly, made my skin congested because it sat only on the surface of my skin, and it smelt really weird.
Would I repurchase? I didn’t even want to purchase it to begin with. It felt disgusting during the facial massage.
ETUDE HOUSE AC Clinic Daily
If this is old packaging, and the new designs came out a while ago, guess how long I had THIS cleanser for.
Yes, I know this is the older formula.
Yes, I know I should have ridden this from my skin care a long time ago.
Yes, I know I ran the risk of skin irritation.
But, I didn’t get any skin troubles, I used it before the expiry date, given that packaging dates differ from the time you open the product and expose it to air for the first time, and I knew that after using this cleanser, I could compare this to the new AC Clean Up.
Would I repurchase? Well, no, because I can’t now. AC Clean Up cleanser, I would purchase it for Summer when my acne gets really bad. It’ll give me an indication as to how the new formula fairs against the classic I’ve fallen in love with over the years.
ETUDE HOUSE AC Clean Up Toner
This toner, compared to the original smells less chemically, but still has that medicinal scent to it. Other than that, the pricing point was the same, as so were the functions and capabilities.
Would I repurchase? Since I’m using a BHA active now, I’m not 100% sure I can, but otherwise I would, since it helps with acne and isn’t drying like other acne skincare products in the market.
POLA White BA Day Mask
Probably the ONLY high end product I was able to retain in my empties garbage.
This mask is somewhat of an extra step, and dedicated for all the extra people in the AB community. This is like a serum, except it is to be worn AFTER applying your moisturizers and such. That said, if you skip out on lotion, cream or whatever you use to keep your skin well hydrated, then relying on this mask is a huge no no.
I found that this mask was quite moist, kept my skin looking brighter, plumper and more glossy than if I were to skip this product altogether. However, being that BA is a collagen based product and intended for those with aging skin, it didn’t click in my mind that this wouldn’t be compatible with my dehydrated, yet, oily skin type at the time of usage. It goes without saying that this mask left me really oily after 3 hours, and it didn’t help my makeup if worn underneath. As a stand alone product itself though, I found this day mask was beautiful on the skin, even with the oily complexion, and it did keep my skin feeling hydrated throughout the day.
Would I repurchase? Since I can get my hands on POLA for a lovely price of $0, I don’t need to purchase it at all, but I did actually spend my money for this bottle, since my regular supplier of POLA didn’t have any Day Mask left, and I had to venture out to buy one for real. At a starting price point of $205 AUD, I think the fuck not.
HAIR CARE
POLA Emollient Oil Essence
This hair oil is the most pricey from what I’ve tried so far, sitting at $35 AUD per bottle. It isn’t cheap, but it worked wonders for my severely dry and damaged hair. I could wear the oil essence alone as a leave in, or use it as a pre flat iron treatment to coat and protect the hair itself. The scent is florally and light, which I liked, and the essence was thick enough to have an effect on my hair, but light enough that it didn’t weigh my hair down.
Would I repurchase? Definitely. It’s the best oil I’ve used to date, and I don’t think Western brand hair oils live up to the quality that POLA hair care provides.
FUDGE Clean Blonde Shampoo
Back when I had grey hair, this is all I used to retain the ashy color. It works wonders for people who want to achieve the ashy tone, or for those who want to maintain ash grey or silver hair. The only downfall is that the formula of this shampoo strips your hair completely of any moisture, leaving your hair dry.
Would I repurchase? Now that my hair is brown, I see no need for this shampoo. Maybe if I decide to dye my hair again, I’ll consider it.
FUDGE Clean Blonde Conditioner
OK this photo is unusable even for my standards.
Clearly I went for the blurry aspect of this photo. It’s my aesthetic.
Nah I’m joking.
I actually suck.
This conditioner is purple toned just like the shampoo, and is designed to act as a second wash of purple to achieve less brassy toned hair. However, the color is so light, that this conditioner does nothing to address hair tone whatsoever. On top of that, the conditioning capabilities of this product are so sub par that you’re better off wasting money on the cheapest hair conditioner you can find at the drug store.
Would I repurchase? I’d rather spend the $25 on food to sustain my hunger rather than this.
JOICO Intensive Hydrator Treatment
I actually asked the sales assistant to help me find a rich hair mask to keep my hair feeling softer and less frizzy, in which she suggested this product to me. Going home, I had high expectations for this hair mask, since the only other hair packs I liked were from Ichigami and Fino. This mask performed worse than those two, and left my hair feeling the same after washing, as if I were to not use it at all.
What a waste of $39.95.
Would I repurchase? No, and I’ll happily stick to my Fino for $19.95.
MATRIX Biolage Advanced Keratindose
Unlike other keratin hair care products, this one didn’t smell like I pissed all over my hands. That immediately was a good sign. The same lady that suggested the shitty hair pack, also suggested me this.
As a product, it really kept my hair feeling a little bit healthier and more glossy in appearance. I hate the spray nozzle though, since the keratin essence was too thick to be sprayed on in a fine mist. Nope, the keratin came out in jets of liquid. Overall though, not a bad product, but nowhere near $35 good.
Would I repurchase? If this ever went on sale, then yes. Otherwise, I’ll probably go back to smelling like piss again, with the cheap $6 Korean keratin essences.
TRESEMME Luxurious Moisture Conditioner
Everyone uses Tresemme because it’s big, cheap and easily accessible. I only bought a bottle because the AB stores didn’t have any Ichikami in stock, and that made me real sad. Nonetheless, as a fill in conditioner, it lasted longer than my Ichikami (I use a LOT of conditioner) and it worked fine too.
Would I repurchase? Sure, if I can’t find a replacement to Ichikami since it iS ALWAY S OUT OF STO C K
ICHIKAMI Moisturizing Shampoo
Speaking of the devil, this shampoo is my go to. It smells nice, works nice, and it’s $25 per bottle so nothing too crazy. I can wash with this and literally go without conditioner if I’m running late, and my hair won’t feel dry at all.
Would I repurchase? I don’t know, ask the AB stores when they’re getting their stock back.
ICHIKAMI Moisturizing Conditioner
Just like above, this works great, smells great and costs the same amount of money. There really is nothing else to say about it.
Would I repurchase? Yes.
YANAGIYA Hair Tonic – Super Cool
This tonic is supposed to stimulate the hair follicles to effectively keep your hair healthier and grow stronger. I bought this only because my head gets really hot, and I wanted a tonic to cool down the scalp in order to make my makeup last longer throughout the day. This tonic did just that.
I guess as far as it’s “actual” claims goes, it did alright. Nothing fancy.
Would I repurchase? Depending on my tolerance to heat in the upcoming summer, I might have to think about it.
MAKEUP
TOO COOL FOR SCHOOL Artclass By Rodin – Illuminizer
I don’t know if I can give a fair review on this since I was only able to use the highlighter 5 times before I accidentally dropped it and it smashed everywhere in my bathroom causing me to cry heavily for he next 300 years as I reflect back in my life trying to pinpoint where I went wrong as a child.
As far as a highlight goes, it worked beautifully from memory, the colors were really nice and the shimmer was natural since it wasn’t strewn with chunky glitters. Just like the contour, the powder itself is very smooth, and glides upon the skin for a beautiful yet skin like finish.
Would I repurchase? Well I have to, since I never even got to try it out properly.
TOO COOL FOR SCHOOL Artclass By Rodin – Contour
Speaking of contour, this is probably the 6th one I’ve used up completely since I first got my hands on it. I love contour, probably a bit too much. That’s probably why I always look muddy in real life, whenever people see me.
Would I repurchase? Well, I only used 6 so far, so I don’t know…
INNISFREE Long Wear Cushion
This is the OG cushion and not the new formula. I’m yet to try it out and see whether it’s the same thing or something completely different, but from what I had here, the cushion itself was nice, matte and stayed on for a very long time.
Would I repurchase? I actually want the My Cushions, you know, the ones with the hella fancy packaging where you can custom design your own case to make it match your cushion aesthetics. If I can get that, then yes I would love to buy another one.
NYX Dewy Finish Setting Spray
I have been sleeping on NYX for so damn long, and I’m so mad with myself because NYX is actually so damn good! This setting spray included.
I can’t say much, since this literally goes over the top of your makeup, makes your base real glossy and sets makeup into place for the entire day.
Would I repurchase? It’s a couple of dollars, fuck the Too Cool For School one I was using before.
If you enjoyed this post, don’t forget to like, subscribe to my blog and share with your friends and family. What are some of your empties you’ve tried thus far? Have you used or are currently using everything I have here on this blog post? Let me know down in the comments below, or through my SNS, which you can find below.
I’ve tried it all; soap bars, shampoo, dishwashing liquid, face cleanser, heck, even actual brush cleansing solution. Nothing really kept my brushes cleaner than what I’m going to share with you now. In saying though, you’ll probably be like “Anthony, what the fuck?”
Keep reading to see what I use to keep all my brushes and sponges free from makeup and dirt.
My secret ingredient for brush cleansing, is literally hot tap water, a silicone brush cleansing device (the one with all the grooves) and…
HOUSEHOLD LAUNDRY DETEGENT
I’ve tried using powder as well, and it works just fine. I would suggest dissolving in warm water, before adding it to more water, as the powder particles can get a bit annoying after a while. I don’t deal with that shit though, so I use liquid instead. Plus, this one here smells absolutely divine.
Yes, you read right. I remember one time, I got makeup all over my clothes, and I tried everything to get it off, and the only thing that remove the makeup from my stained clothing was laundry detergent, so I decided, why not use them on my makeup brushes as well?
Keep in mind that washing liquids of all types have a pH higher than 7; in chemistry terms, these agents are referred to as alkaline. When mixing an alkaline with an acid, you can neutralize the two agents to (hopefully) produce a neutral pH rated substance.
With this in mind, I always wash my brushes and sponges with a laundry detergent, and follow with a quick wash using a sub acid cleanser for extra precaution.
I don’t measure the quantity of liquid to water. I literally pour and guess the amounts each time, depending on the amount of brushes or sponges I am washing. For reference though, I usually try follow the recommended 1 cap-full of detergent to 5L of water guideline, as I would usually with my clothes.
Sitting at the bathtub, with my laundry detergent and hot water ready, I prepare all my makeup tools to the side, ready for washing them all.
I actually love the design aspect of the Pony Effect brushes being magnetic and able to hang upside down for perfect drying.
I find that washing your tools with just soapy water and your bare hands can prove to be difficult, so I picked up a cheap brush egg with grooves built in, to allow my brushes to be thoroughly scrubbed down and free from makeup, dirt and impurities.
I’m pretty sure I got this for $3 somewhere in Perth, but I could be mistaken. This gadget has been sitting in my bathroom for so long now, I forget the exact price I purchased it for.See the grooves it has? There are straight indents perfect for your larger brushes like foundation and powders, and tiny cylindrical indents perfect for your smaller brushes like brows and shadows.
From here on out, it’s as simple as dipping the brush in the water, giving it a quick swish around and scrubbing the living daylights of them all, to ensure they’re clean. With the laundry detergent mix though, I’m spending no more than 30 seconds per brush, so cleaning does not take long at all.
To be completely honest, this picture was taken after cleaning only 4 brushes. My fingers get darn pruney very easily.
For verification, I put to the test my most stubborn brushes to clean against this laundry detergent mix.
This is the Stippling Brush from Etude House. One of my favorite brushes for applying blush and shading.
I use this brush practically everyday to add blush to my cheeks, and blend out my contour. Sometimes, I’ll even dive right in with foundation if I want to be a little bit extra, or have a lot of time on my hands. My last cleanse with this brush, using a brush cleansing solution from a Western brand (I can’t remember which, but DB sounds familiar) left all my tools stained and not properly cleaned. I thought that this would be a good opportunity to see how it fairs against laundry detergent.
Directly after washing with the laundry detergent.
Though it”s not pristine white, most of the color did come off very quickly, and the water was practically clear giving the brush a rinse after a 15 second scrub. I guess, with brushes used for powder products, they clean almost immediately.
Honesty, my brushes tend to get dirtier than this. Unfortunately for me, this flat foundation brush was one of the more “cleaner” ones.
Next up is foundation. I use the Pony Effect Flat Foundation Brush virtually for all liquid products. Foundation, concealer on wider areas of the face, contour, liquid highlight. EVERYTHING. So in saying that, this brush was filthy prior to cleansing. Again putting the laundry detergent to the test, I wanted to see how liquid makeup fairs against it.
A tad longer than powders I must say, but overall, 40 seconds on a liquid makeup brush isn’t too bad either. Again, this photo was taken directly after cleansing with laundry detergent.
Clean. Not a single drama at all with laundry detergent. Had I used a specific branded brush cleanser, I’d probably be sitting at the bathtub for a good 10 minutes just on ONE foundation brush. Don’t even get me started on how shampoo and dish washing liquid works on them.
Etude House makes a good spooly brush in my opinion. As shown here, I like to bend my spooly on an angle for easier usage. Most brushes would snap, but this Etude House one hasn’t thus far.
How about a spooly? Such a weird brush to clean. Whenever I do my brows, I always use a wax to sculpt my brows, either powder or liquid to fill in, and then a coat of brow mascara to change the hair colors. With each step, I use my spooly to brush out the brow hairs into place, and to also blend the makeup. That said, this brush used every day, get’s a lot of gunk on the bristles.
I might have scrubbed too hard, a chunk came off at the top.
Not even 10 seconds, and the brush was clean. What else can I say, other than not to scrub this brush too hard as the bristles might fall off like mine. Oops.
NOW FOR THE REAL TEST
Brushes are easy to clean, but how about sponges? They’re the real devils when it comes to makeup tool washing. Again, just like the brushes, I’ve never actually had any good luck using everything else. Even specific brush cleansing solutions. The beauty sponges always stay dirty, and cushions don’t ever return to it’s former white color.
Too Cool For School marshmallow puff, since the original beauty blender isn’t available here from my knowledge. Speaking of which, I need a new sponge. Any recommendations?
Beauty sponges are one of the most daunting to wash; they absorb all the water and end up not even cleaning the makeup off properly. Even when you scrub and squish the living daylights out of them, they always remain dirty. How does laundry detergent fair though?
See the cracks? I definitely need a new sponge. Somebody help me!
I forgot my sponge was this shade of pink. Wow. That’s all I can say.
My arch nemesis – The cushions
“Yeah, but sponges are more easier to clean than cushions are.”
That’s very true. I’ve gone and seen many reviews on cushion cleansing, and virtually every single one I saw, nobody could get their cushions looking half decent no matter what they tried.
I mean, at least the cushion is white…
The liquid definitely made the cushion white again, which is definitely a relief, and the cushion itself is clean for sure. However, as the image shows, the Etude House band is stained from the foundation, and I wasn’t able to remove it at all. Nonetheless, this is by far the most cleanest I’ve ever got a cushion to, so I’m pretty darn happy.
After cleansing with laundry detergent, I go in for a second cleanse with face wash, and then lay all my brushes and sponges out on some kitchen paper to dry. Except for the Pony Effect brushes. I hang them upside down.
You can tell, most of my brushes are Etude House. They don’t shed at all when you wash them, and they stay feeling soft as ever, so why spend money on brushes when I rarely use them to begin with?The handy magnetic design means water can’t get to the base of the brush, dissolving the glue that keeps the bristles in place. Nonetheless, the fluffier brushes like the powder brushes and the blending eye brushes all shed like crazy, which defeats the purpose I guess.
After all the hard work, and probably 30 minutes in the bathroom, would I recommend using laundry detergent as a cleaning agent for your makeup brushes?
Well, it all depends. Of course looking at it from a skincare perspective, I’m sure we can all agree that laundry ANYTHING should never come in contact with our skin. However, the results do speak very loudly, and I guess, my answer is somewhere on the fence.
Until I can find a good makeup brush cleanser, I guess I’m sticking with Fab.
If you enjoyed this post, then don’t forget to like it, subscribe to my blog for future updates, and share with your friends and family. Do you have any secrets when it comes to cleaning your brushes? Maybe you’ve seen other methods that might be better than laundry detergent. Don’t forget to share ideas, or any feedback through the comments down below, or through my SNS.
They’ve been sitting in my bedroom for quite some time now, so I might as well whip them out and see what stick makeup products can actually do as far as makeup goes. I own 5 Etude House Play 101 sticks, a 3CE shimmer stick that I haven’t used on myself and an I’m Meme Shading stick that’s about to run out.
What sort of makeup look can I create with these products? Keep reading to see what kind of mess I get myself into today.
From left to right: PLAY 101 #3, PLAY 101 #12, PLAY 101 #13, PLAY 101 #11, PLAY 101 #10, 3CE Shimmer Stick #Peach and I’M MEME Shading Stick
Stick makeup isn’t new to the K-Beauty world by any means, but it is unfortunately one of the less popular beauty items in people’s personal disposal. I honestly bought these since each and every one I own were the only available here in Perth, and I felt like blowing my money on crap I didn’t need.
From top to bottom: PLAY 101 #03, PLAY 101 #11, PLAY 101 #12, PLAY 101 #13, PLAY 101 #10, I’M MEME Shading Stick, 3CE Shimmer Stick #Peach
As you can tell from the photos, the products aren’t as pigmented as I hoped for, other than the foundation stick and the shading stick. The others were lacking in pigment. Each formula was notably different as well. PLAY 101 #03, #12, Shimmer Stick and Shading Stick were all creamy in texture, whereas the PLAY 101 #10, #13 and #11 were more satin-powder type.To begin with the makeup, I always start off with a blank canvas, properly cleansed and moisturized. For reference, I use a pH 5.5 cleanser, tone with a pH 4.5 skin and moisturize with a gel type lotion.
Anthony is back at it again with the OLENS Russian Velvet in blue, which I got at Cosmehut for $36 a pair. They are too thick to wear comfortably in my opinion, and I’m hoping that, just like the OLENS x ANNA SUI lenses, these will become thinner over time and be comfortable. For now, I personally don’t recommend them.
I saw a sponsored Etude House video featuring beauty creator Pony, where she drew stripes across her face using the PLAY 101 foundation stick, so I took PLAY 101 #03 and did just that.I found that using this product, using a sponge gave more of a natural application than using a brush since the formula was so creamy. In saying that though, using a sponge only allows the product to apply up to a medium coverage, whereas a brush can stretch the foundation to a medium-full. Using a brush doesn’t allow the product to work well with the skin and emphasizes texture. It also makes the base look very cakey as well. Overall, the finish of the product wasn’t too matte nor too dewy. Somewhere in between, which I quite liked.
With two different shading sticks, I decided to use PLAY 101 #11 on one side, and the I’M MEME Shading stick on the other.
Beginning with the PLAY 101 #11, I applied the contour shade as per usual, but had to use 3 layers altogether just to get some color payoff. The overall tone was way too orange in shade for the product to be used as a contour, but I managed somehow.
I did the same with the I’M MEME StickJudging by the photo, you can immediately tell that the I’M MEME Shading Stick is way more pigmented, and has better color payoff. I only needed a single layer to achieve a contour.
In saying that though, the formula is extremely creamy, and thus, blending out for precise contour proved to be difficult. This can ultimately be fixed by using a brush and being careful; all I had no energy or effort for.
With contour done, I decided to do the same with the two blusher sticks; PLAY 101 #13 on one side, and PLAY 101 #12 on the other.
PLAY 101 #13 was sheer upon application and had fine gold shimmers throughout the product. Since this stick applied smoothly with it’s powdery-satin texture, it made my skin appear fairly smooth. However, blending the product out practically made it disappear. It was fairly disheartening.
In person, you can barely make out the blush color if you pressed your face against my cheekbones. On camera, yeah not a single trace of color at all.
PLAY 101 #12 was my hopeful product, since the formula was creamy type, and the color was noticeable upon application. However, just like the latter, this product blended out into almost nothing. At least in person, you can make out the color on the cheeks, but on camera, you can’t really see anything at all.
The last two sticks were the highlighters, which I was super keen on trying. I love me some highlight, especially cream type as they offer you natural glow that can either be worn alone, or be used as a base for your powders which strengthens the overall highlight.
Following suite, I decided to use PLAY 101 #10 on one side, and 3CE Shimmer Stick #Peach on the other.
PLAY 101 #10 was extremely brittle with it’s powdery texture, so chunks of the stick kept breaking off on my cheek. It was so damn infuriating to use and I really didn’t like it from the get go. The product was also strewn with chunky glitters which wasn’t appealing in the slightest. Overall, blending wise, it worked decently so I was at the very least, able to buff away the chunks of the stick sitting on my cheek bones.
I really don’t like 3CE much as far as their makeup goes, so I wasn’t expecting much when I was trying this shimmer stick.
However, to my surprise, it performed pretty darn well. The formula is on the creamy side, but blends out like a dream. Rather than chunky glitters, the shimmer stick has pearl pigments that actually make the skin appear as if it’s glowing.
After trying out the stick products, I finished off the base makeup by setting everything with a bit of powder, adding nose contour using the I’M MEME Shading Stick and filling in my brows.
For extra trials, I wanted to see how the blush sticks performed if they were to be used with a shadow brush and applied directly onto the eyelid.
With 6 layers, I used a small dense shadow placement brush to apply PLAY 101 #13 onto the entire upper lid, and halfway on the bottom lid. Since the pigment was weak to begin with, I wasn’t expecting the color to really peek through even with a brush, and I wasn’t wrong.
Using a shadow placement brush and PLAY 101 #12, apply the cream to the outer and inner areas of your eyes with preferably, 4 layers since the color wasn’t showing up at all.
I tried using the PLAY 101 #11 on the outer corners, but again, the color was way too sheer, so I opted for a dark taupe eyeshadow instead and placed that on the outer corners to contour the lid, and add color variation. I then set the rest of the eye with translucent powder just because the PLAY 101 sticks were creasing and moving around.
Since I wanted to at least finish off an eye look, I decided to draw a winged liner to tie everything into place.
Just to be extra, I added 3CE Shimmer Stick #Peach to the centre of the lids, inner corners and bottom eyelid for shimmer, and it performed excellently with just a single layer.
With that, finishes the eye look (unless you want to curl and add mascara as well) and gave me enough information to come up with a final judgement on the stick type products.
Overall, I am so dissatisfied with what I used today. The contour products were lacking on both sides since they were too orange, and the PLAY 101 #11 was just too sheer to even be seen on the skin with a single layer. At the very least, the I’M MEME Shading stick was somewhat useful.
The PLAY 101 #12 and #13 were products I sort of had expectations for, which ultimately let me down in the end. They blended away to nothingness with a sponge, and didn’t show up very well with a dense brush. I can’t say anything positive about them, other than the #13 being pretty in shade if you looked at it from it’s packaging.
The PLAY #03 was surprisingly decent as a foundation when used with a sponge, The only fault is that the coverage isn’t the best, and you’d better not risk looking cakey if you’re using a brush.
The 3CE Shimmer Stick #Peach actually blew my expectations out of the water. I fell in love the moment I started blending it into my skin with my sponge, and when I used it on my eye lids. The color is beautiful, the highlight itself is very natural, working alone for a beautiful glow, or as a base for your powder highlights. Out of everything I tried today, I would only recommend you buy this one, since it performed well.
Have you tried the PLAY 101 sticks or stick makeup before, or are intrigued as to why I don’t like them? Maybe you own some stick products that I might like. Let me know down in the comments below, or through my SNS and tell me your experiences with Stick Makeup. As usual, if you enjoyed this post, then give it a like, subscribe to this blog for future updates, and share with your friends and family.
Throwing away the idea of the rosy pink makeup in my last attempt, I went only for the red light concept with the natural one side, and full glam on the other. Again, with Krystal of F(x) as my inspiration, I decided to reattempt the Red Light makeup.
Is there really a need for me to say that I CLEARLY DO NOT own this image NOR DO I CLAIM COPYRIGHT, or is that already a given?
I have to stress that I am NOT a professional makeup artist, nor have I received an ounce of training whatsoever, and so I kindly ask you not to expect much at all.
STEP ONE: Start off with a clean and well moisturized face. For the full Krystal effect, have only one contact lens in the eye you are going to do the heavy makeup on.
The natural lighting was weirdly changing every 5 minutes, because here in Australia, winter is undefined. It’s either oddly sunny, heavily raining with clouds scattered throughout the sky, or both at the same time. With that said, hopefully some pictures aren’t brighter than other ones.
As far as skincare goes, I always wash my face with a pH 5.5 cleanser, tone using a pH 4.5 skin and moisturize using a gel type lotion.
I’m using my trusty old OLENS x ANNA SUI grey contact, sitting at a DIA of 14.2mm. I have a GEO Flower lens which is 15mm DIA but I found that it looked too strange to have a natural 13.8mm eye with a 15mm DIA lens. If you own a 14.5mm lens and your eyes are as big as mine, then I’d probably recommend you try using that as it creates a better effect. BTW I don’t recommend wearing these lenses for a long period of time, since the lens itself is fairly thick and can become irritatingly uncomfortable to wear as it gets drier.
STEP TWO: Prepare your face by applying your base, concealer and cooking material. Skip this step if you prefer to do your eyes first.
But I use a lot of powder. Probably best to avoid baking like I do.
STEP THREE: Prepare your eyelids using a primer and base color.
I used concealer and a muted taupe shade as my base color for the eyeshadow.
I forgot about the bake on my nose, that I ended up leaving it for too long. After removing the bake, my nose felt incredibly dry afterwards.
STEP FOUR: Draw your guide for your eyeliner using shadow before applying eyeshadows
This step really is optional. I’m just terrible at planning and usually go with the flow when it comes to everything, so just as a precaution, I chose to draw the guideline for my own benefit. Heck, maybe this step might help one of you guys.
STEP FIVE: Avoiding the middle of your eyelids, apply your dark shadow on the entirety of your eyelid, including and emphasizing the crease. Extend the color all the way to the front and inner corners of the eye, and drag along the bottom eyelid halfway from the front of the eye.
Krystal actually had black on her eyes, but since I wanted the look to be a bit softer, I opted for brown. The color is also way more forgiving than black is.
STEP SIX: Using your finger or a dampened shadow placement brush, apply a shimmery shade that is two shades lighter than your crease color to the blank areas of your eyelids for color variation.
If you used black, then a silver or a gold shimmer will look really nice with this look. Otherwise in my case, I used a shimmery copper with fine glitters.
STEP SEVEN: Line your eyes following the guideline you created, winging the liner upwards to create a cat wing.
STEP EIGHT: Fill in your brow either the way you usually do them, or seek permission from the All Maker and rock an angry birds styled brow.
I didn’t ask the All Maker though, and unfortunately for me, I’m going to hell. God dammit.
Unlike Krystal’s eye look, by using brown and adding the central shimmer, the eye looks less dark and more wearable.
STEP NINE: Curl your lashes and apply your mascara, and if necessary, apply highlight to your half of the face to complete the makeup for your dark side.
With the concept photos, Krystal appeared to not be wearing any blush or contour at all, so it’s up to you whether you want to apply it or not. I added the tiniest bit of blush to the outer cheek for color to the face, and highlight along the cheekbones to bring back some liveliness to the skin.
Once again, my facial expression is giving off the “I’m dead to the world” feels.
STEP TEN: Starting off with your natural eye, make sure to have primed and set your eyelid ready for eyeshadow. Take a camel shade and apply to the inner and outer eyelid for definition.
Usually I pray for pigment when it comes to eyeshadows, but in this case, I really wanted no pigment whatsoever. This eye look needed to be extremely light, as if it were barely there, in order to achieve the “no makeup” feel.
STEP ELEVEN: Line your eyes with dark brown eyeshadow, being careful not to extend past the eye line. Follow the natural shape to create the “no liner” appearance. Drag the color slightly down to the bottom eyelid for the “puppy” liner look. Alternatively, apply BROWN eyeliner to the upper water line and in between the lashes for the “no liner” appearance.
Except, I lost my pencil liner so I can’t actually fill in the water line naturally. I went for the latter instead.
STEP TWELVE: Fill in your brows very naturally, following the natural shape and curvature of your brow, to make them look as if they haven’t been drawn on. Curl and apply mascara to your lashes and with that, completes your natural eye look.
STEP THIRTEEN: Finish off the rest of your makeup however you please. Make sure to create the gradient lip look on your dark makeup side, and that completes the Red Light inspired makeup.
I also decided to contour my nose because why the fuck NOT.
Once again, I’m probably going to do another attempt, this time, trying to actually recreate the proper look, by paying close attention to their eye makeup and the rest of the face. For the time being, if you enjoyed this post, then don’t forget to like it, subscribe to keep up to date with future blog posts and share with your friends and family. As per usual, your feedback is highly regarded and appreciated so don’t forget to leave any comments down below, or through my SNS.
I woke up one day thinking that I have palettes I haven’t touched, just sitting in my bedroom and it’s about time I tried them out to see what I can pull out of my ass as far as a makeup look goes. Being lazy in bed, I placed my headphones in my ears and put my music on shuffle. Sure enough, the first song that came on was F(x)’s Red Light, which threw inspiration into my head.
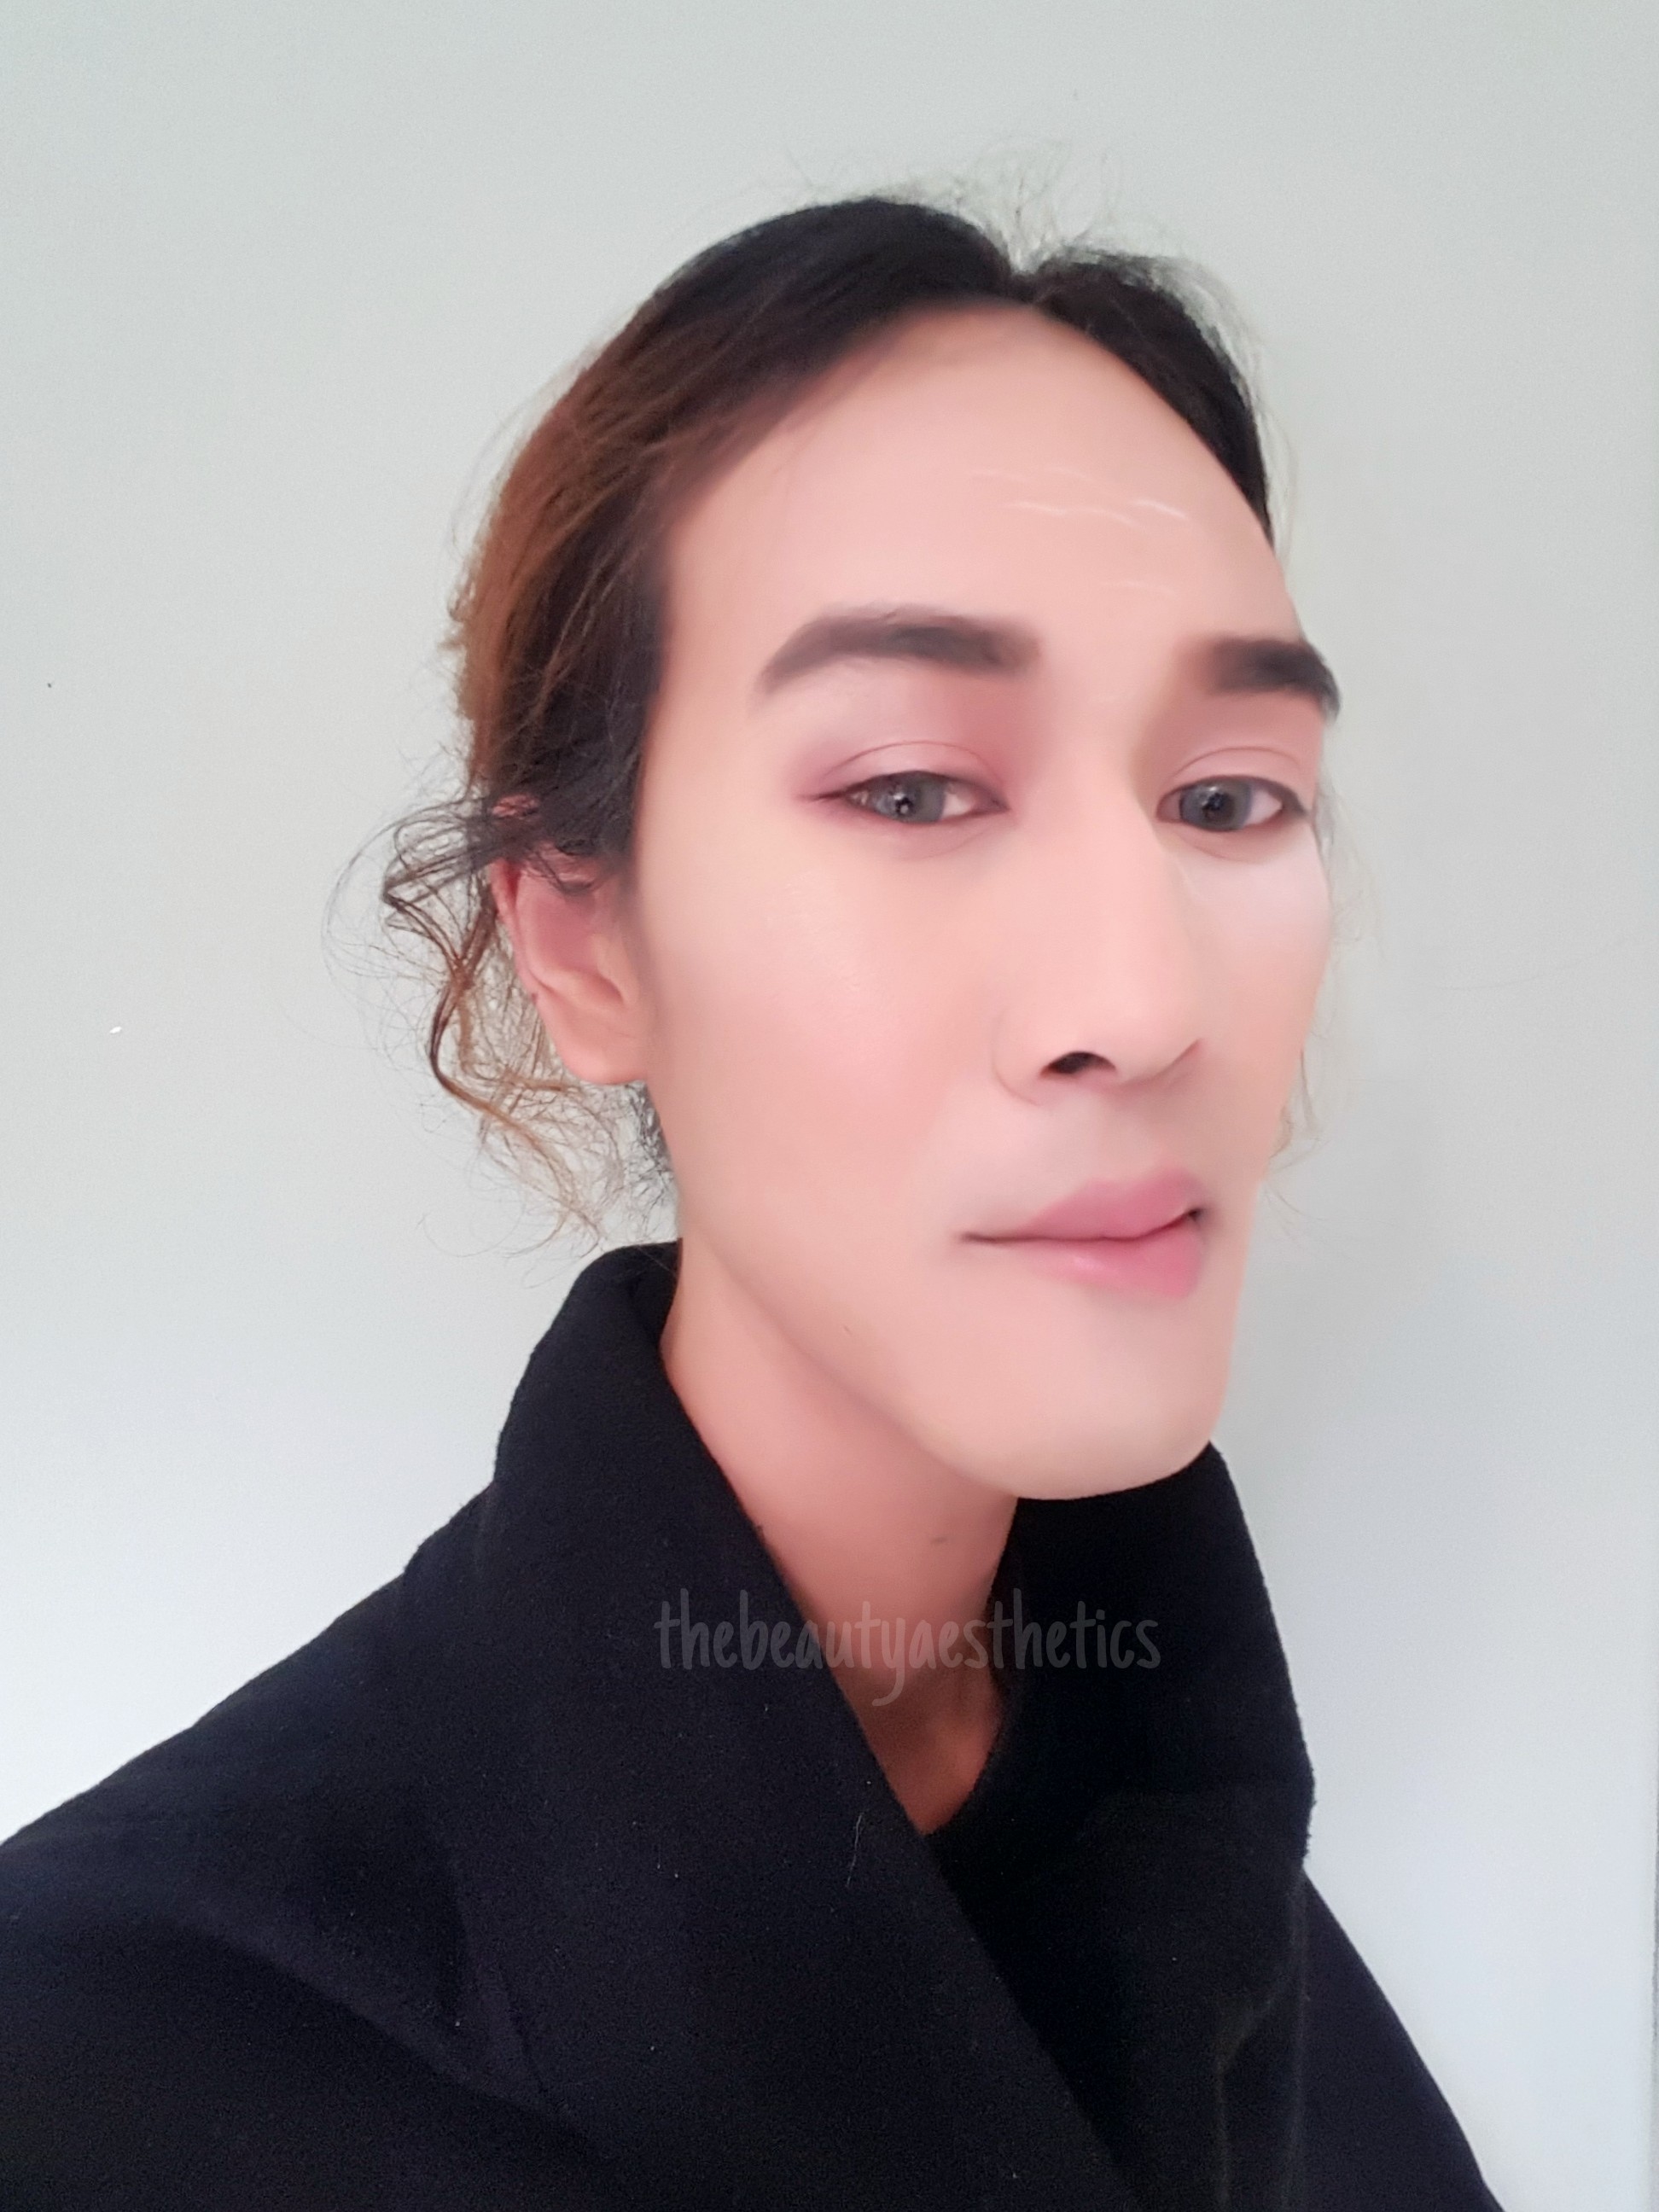
But let’s take a moment at how damn womanly I look though.
This makeup look I’m sharing with you is a red light inspired makeup that is slightly more wearable than the concept photos they released for a member in particular, Krystal. I also looked to Pony makeup tutorials for inspiration and fell in love with one of her simple looks, called Rosy Peach makeup, where I decided to use the colors on my lids for a more “made up” look. Keep reading to see how I achieved this mess.
Just like in the red light concept photos, one side will be slightly more natural than the other half of my face, rocking out a more glammed up look that is a little bit more wearable for going out. (Though I don’t recommend it because the makeup itself just looks strange to be worn out in public).
STEP ONE: Always start off with a freshly cleansed and moisturized face. Oh, and get your hair out of the way by tying it up, or securing with a makeup brush like I did.
I can’t stress enough how important skincare is for your face AND your makeup. Without adequate care for your skin, you can’t achieve decent makeup, so I strongly advise investing your money more into skincare than you do your makeup products. Remember that even terrible makeup products will work better if your skin condition is at it’s prime, than if you were to apply the same products on an unclean canvas.
As per usual, I cleansed with a 5.5pH cleanser, toned with a 4.5pH skin, and moisturized with a gel lotion.
Why my face looking like I’m dead to the world? I mean, I am, but still… By the way, new contacts are Russian Velvets from OLENS in blue, which aren’t the best contacts but are wearable for occasions like this. Personally don’t recommend because they’re uncomfortable.
STEP TWO: Apply your base and concealer as per usual, and additionally, if you prefer cream products, you can apply your cream contour/highlight in this step as well. Finish with a bit of powder and bake under your eyes.
There isn’t any wrong or right method when applying your base, so long as you apply it in a manner that prevents your makeup looking cakey or streaky. Make sure the base adheres nicely to the skin, is well blended and that most importantly, you are happy with the final results.
I chose to go a shade lighter than my skin tone simply because I want the shading of my face to look stronger.
I decided to also do my eyebrows in the same step as well, since I think brows can ultimately frame the face and give you an outline to how you want your eye makeup to look. Leaving the bake under your eyes is also optional, but I left mine simply because you’re applying eye shadows and if any fallout does occur, it’s easy to sweep it away with the bake.
Giving you those Kim K vibes.Basically, you want your base, bake and brows in place before you start the eyes, or completely fuck everything off and start with the eyes first if that’s how you do your makeup. I chose the latter because #lazyyyyyy
STEP THREE: Apply a base and a base color to the eyelids to create a blank canvas for eyeshadows to be worn upon.
I have very delicate eyelid skin, where the veins literally peek through. A traditional eye primer isn’t enough to cover the veins so I opted for concealer instead for added coverage. If you don’t have the same problem then a traditional shadow primer will do just fine.
I used a muted taupe color over the entire eye as a base color.
I even drew terrible guidelines to where to place the shadows. Ah so professional.
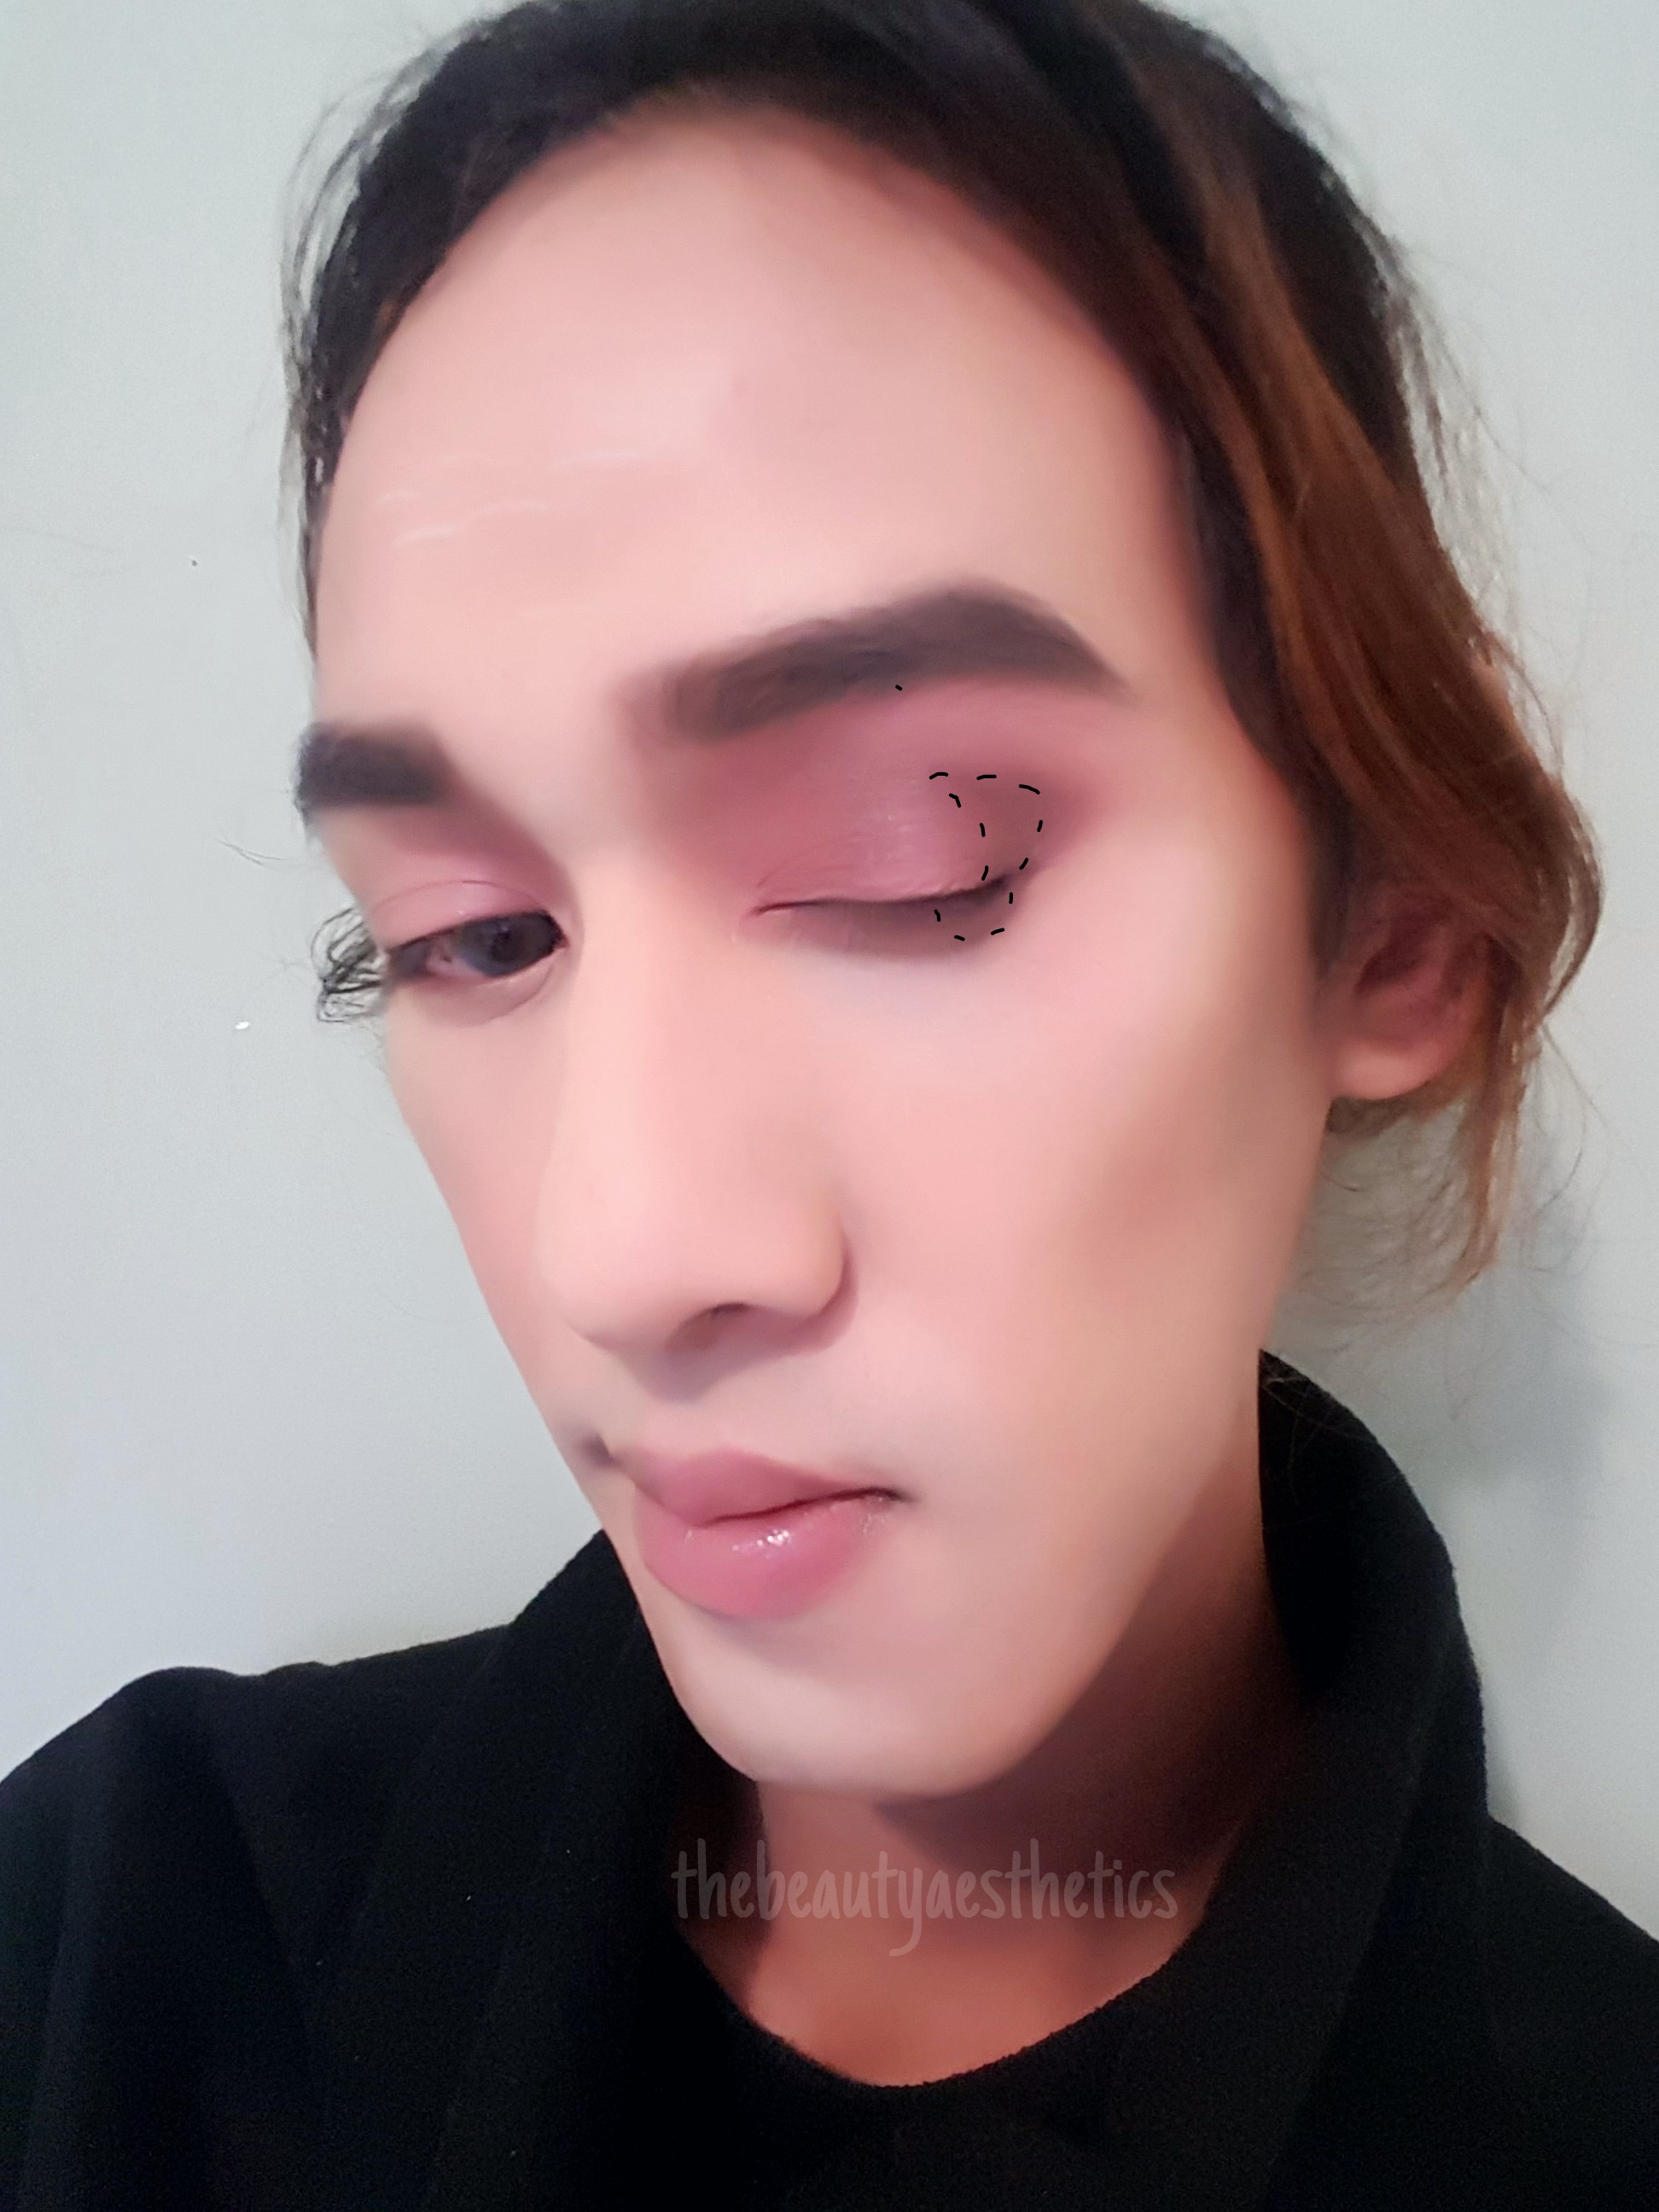
STEP FOUR: Starting with the natural side, apply a wash of rose pink color onto the lids.
STEP FIVE: Use a muted wine color in the outer V and blend into the rose pink shadow for contouring. Intensify the outer corner by using chocolate eyeshadow with a light hand. You don’t want the eye to look too dark, just enough for definition
STEP SIX: To add light to the eyelid, apply a shimmery peach toned shadow on the centre of the lids, inner corners and the entirety of the bottom eyelid. Blend slightly to remove harsh edges.
Guess what’s on my lip, cause I have no idea what it is TBH.
STEP SEVEN: Using a liner of your choice (I chose liquid cause it’s the easiest to draw with IMO), follow the natural shape of your eye and draw an extremely thin line, dragging the liner out slightly. Don’t lift the wing upwards or create a long wing as this creates a cat effect, which defeats the purpose of the natural look. What you want to achieve here is a naturally defined eye line. With the same chocolate shadow you used to contour with, apply that at the end of your bottom lid to connect the eyeliner for a “puppy” sort of liner feel.
STEP EIGHT: For the makeup side, just as before, you want to apply the same rose color to the mobile lid, and contour using the wine shade from before.
So just like before, apply your base tone to the eyes before adding color.Then your rose.Then your wine. Might as well grab yourself some REAL wine while you’re at it.
STEP NINE: Use a camel shade to define the outer V and drag the color into the crease, making sure to blend the colors naturally with each other. Using the same chocolate shade from before, intensify the corner and drag the color slightly into the crease; this time you are trying to make the eye darker, so you can go ham at this stage if you want.
So apply your camel shade around the areas shown, and then apply chocolate to redefine and intensify.
STEP TEN: Using the same peach tone, apply the color to the centre of the lid, inner corners and bottom eyelid for color variation and to add light to the eyelid.
STEP ELEVEN: Apply eyeliner, this time, winging the liner up to create a cat eye effect. Just like with the natural side, use the chocolate color on the bottom lid to connect. With this, completes the eye makeup.
That eyeliner is messy, why did I NOT see that before.
STEP TWELVE: Curl and apply mascara, define the face with contour (I sharpened the dark makeup side, and left the contouring natural on the other half of my face) and highlight. Apply a little bit of muted rose blush if you like, or skip this step if you want.
Try not to apply too much highlight like I did; I went crazy.
I could probably sit on a cliff and guide ships back to shore safely with the amount of highlighter I used.
STEP THIRTEEN: Finish the makeup with a pink or nude lipstick and that finishes the complete look.
Or, you can add extra if you want. It’s makeup after all and you can do whatever you please with the products you spent your money on. Treat yo’self.
Please do your hair, unlike me. I just look messy now.
So, if you read up till here, then you’d realize by the end of this tutorial that the makeup isn’t exactly F(x) style, nor is it Pony style. I got inspiration from the two and used both ideas to create this look. If you do however, want me to try (and probably fail) recreate either looks, then please let me know in the comments below or via one of my SNS accounts. Don’t forget if you enjoyed this post, then give it a like, subscribe to this blog and share with your friends and family. Until the next post, this has been Anthony from The Beauty Aesthetics.
I don’t know why it came as a shock for people to realize that I do wear makeup regularly, and don’t notice whenever I do until I actually say something. Although, in saying that, most of the comments DO come from males, and probably 5% come from females. Here today I wanted to share with you my way of applying my makeup naturally to enhance my appearance.
This look is incredibly simple to achieve, and most beginners have been able to at least, replicate this look I’m about to show you now. Trust me when I say beginners; I taught a few first time makeup applicators and a few old customers this routine, and they got the hang of it within a day or two. In saying that, don’t expect much of a real look; more so what I would usually wear daily on normal circumstances where I am presenting myself to the public eye.
Special shout out to Emi Lee who suggested this post idea, and for NOT TELLING ME I HAD SHIT ON MY JUMPER!
I am so damn offended. Please excuse the little white stain thingies on the collar and above the pizza logo. I’m pretty sure they’re from when I was attempting to bake another cake, which totally failed. Also, please excuse my nappy ass hair, I’m trying to find a decent hair product that will work for my dry hair, since black owned hair companies here in Perth don’t have what I need to restore the moisture back into my locks.
STEP ONE: Start off with a well prepped face, using adequate skincare without heavy layers.
I usually recommend to keep skincare at a minimal whenever you apply makeup, since too much skincare can prevent makeup sitting nicely on the face. I always cleanse with a pH balanced cleanser, following with a toner to protect my skin, and a light gel type moisturizer of some sort. My objective whenever I apply any sort of makeup is to ensure my skin is hydrated without any sticky or heavy feeling you may get when applying other products like serums, ampoules, even cream.
I USED:
TOSOWOONG Enzyme Powder Wash
BENTON Aloe BHA Skin Toner
BENTON Aloe Propolis Soothing Gel
STEP TWO: Prime your face using two different primers to target skin concerns.
I don’t have severe pore problems these days, but in saying that, makeup tends to emphasize pore visibility on my skin, so I like to apply a silicone based primer around my nose and areas with lines or oiliness. With the rest of my face, I sometimes look dull, so to correct this, I opt for a pink pearl base to brighten up these areas.
I USED:
THE HISTORY OF WHOO Gongjinhyang Mi Essential Base
ARITAUM Pore Master Sebum Control Primer
STEP THREE: Using a base you prefer, apply lightly to the skin to enhance the appearance of your face.
I absolutely love dewy makeup, but the formula of dewy products don’t look nice on my skin, so I often choose velvet finishes, or matte formulas. I can always cheat the appearance of glossiness if I use highlighter anyway, right?
I’m also way too lazy for brushes or beauty blenders (though beauty blenders are my absolute favorite tools to use) so I often reach for a cushion compact since they’re quick and easy.
I USED:
SULWHASOO Evenfair Perfecting Cushion in shade 25 Deep Beige
STEP FOUR: Conceal troubled areas using a product one shade lighter or similar tone to your base makeup.
My under eyes get really dry and crease easily no matter what I do. Trust me when I say that no amount of eye cream will help. I’ve gone from using budget branded eye creams, to Shiseido, History of Whoo, Sulwhasoo, POLA BA… you name it, I’ve probably tried it already. Nothing but plastic surgery will help now, so in saying that, I have to make sure the concealer under my eyes isn’t too drying.
For the rest of my face, a pot concealer tends to have the highest coverage, so is easy to hide any trouble spots that the base makeup wasn’t strong enough to conceal. It’s as simple as taking the concealer on your finger tips and dotting it on the area of concern, then using a small dense brush, as if you’re wiping away, brush the concealer to blend into your skin texture and base.
I USED:
THE SAEM Cover Perfection Tip Concealer in shade 1.5 Natural Beige
SHISEIDO Spotscover Foundation in shade S300 (I believe this is only available in Japan only and unless your beauty retailer trades with Japan, you’re more than unlikely to be able to get your hands on this unless you order online or physically go to Shiseido in Japan to get it.)
PONY EFFECT Magnetic Brush Pro number 105 Concealer and Lip
STEP FIVE: Apply cream or liquid highlighter to the upper part of your cheekbones for a natural glow.
I like layering highlighter since powder type can make your skin look a tad chalky. By using a cream or liquid type first, you can naturally add more glow without the chalky or powdery appearance, and tends to look more natural as well. Additionally, you can also add this highlighter down the nose bridge or forehead if you like. You can also replace highlighter with a hydrating concealer a few shades lighter than your base, if you want extra coverage or a more stronger strobe (which is what I did). It’s up to you whether you want to blend it out with a tool or your fingers, but I chose the latter because I’m too lazy for tools, and fingertips gives me decent blending without too much friction against my face.
I USED:
TOO COOL FOR SCHOOL Lunchbox in shade 2 Watery Skin, the highlighter only
THE SAEM Cover Perfection Tip Concealer in shade 1.5 Natural Beige
STEP SIX: Set your base with a translucent powder using a big fluffy brush, adding extra powder to bake under the eyes if you crease, and around problematic areas if you tend to get oily.
I like to use loose powder since it’s easy, works nicer than pressed on certain occasions, and since I bake my eyes and nose, it is the obvious choice between formulations. I actually take a small fluffy brush and pack the powder onto my nose and under my eyes, since it works like a beauty blender, without the extra dry feeling you might get if you do baking techniques.
I’ve tried banana powder before, and look… if you have a warmer undertone then go right ahead because it actually is really good. However, my face isn’t yellow in tone, so a yellow powder will only look odd on my skin.
Using a big fluffy brush as well, I swirl it into my skin after applying powder just to lightly buff the product into my skin. If I use a flat top brush, it tends to give my face a “too matte” appearance which doesn’t look right on me.
I USED:
SHISEIDO CLE DE PEAU Poudre Libre Transparente (I’m pretty sure this is available only in Japan, though there are some Shiseido stores around the world, now selling this range)
PONY EFFECT Magnetic Brush Pro number 101 Powder
PONY EFFECT Magnetic Brush Pro number 102 Highlighter(Used for baking only)
STEP SEVEN: Shade in your face to give the illusion of a more structured face shape. Additionally, contour your nose and eyelids at the same time if you prefer doing this.
THIS IS LITERALLY MY FAVORITE PART OF MAKEUP. Using brown powder to cut away your face leaving nothing but perfection behind. Whenever I contour, I have to be very careful, since I am the kind of person who ends up with a dirty looking face from abusing the product, but it’s so much fun. You know those beauty Youtubers that make fun of people who contour to the point it looks like they haven’t washed their faces in 3 months? I’m that kind of contourer. I take contour powder along my jaw and up the sides of my face, focusing the product at the base of my jawline and temples. I then lightly sweep contour along the hollows of my cheekbones for a more sculpted look and finish by shading in the nose for a slimmer appearance.
I’ve always reached for the Too Cool For School shading powder, since the colors aren’t too ashy nor red, which can replicate real shadows along the face. It is, however, not the cheapest here in Perth so I do want to look for a more budget friendly shading powder, since I tend to hit pan after a month of using it. Any suggestions will be greatly appreciated.
I USED:
PONY EFFECT Magnetic Brush Pro number 103 Cheek and Contour
TOO COOL FOR SCHOOL Artclass By Rodin Createur Du Contour
STEP EIGHT: Fill in your eyebrows following your preferred or natural eyebrow shape, focusing most of the pigment at the ends of the eyebrows for a more fuller and natural appearance.
Since my face is long, I do prefer to keep my eyebrows on the more straighter side, with a thicker appearance to combat the face length and forehead space I have naturally. I’ve always liked arched brows but I’m unable to achieve the look without looking like a hot mess. With that said, I always sculpt my eyebrows with a wax type pomade or a liquid in a chocolate shade, starting from the centre of the eyebrows and drawing a straight line at the top and bottom of the eyebrow, working my way out to the tail. From there on, I fill in that half using angled strokes to achieve the appearance of eyebrow hairs, whilst darkening for a more fuller look. Taking a powder that matches the liquid component of the eyebrows, I then gently shade in the front of the eyebrow, connecting it to the nose contour shading and brushing the hairs into place (an at the same time, softening the eyebrow) with an angled spooly.
I lost my eyebrow brush I got from the Missha store (which is by far my favorite brush for using on my eyebrows since it’s stiff and dense) so I opted for the Etude House angled eyebrow brush, which I really didn’t like. The EH brush is way too flimsy and can’t give me the precise application I’m looking for, so if you have an alternate, then please send in your suggestions!!!
I USED:
LANEIGE Eyebrow Cushion-Cara Two Tone in number 1 Grey Brown
ETUDE HOUSE My Beauty Tool number 352 Eyebrow Screw (I bent the brush on a 90° angle for ease of use. Whether you do this as well is to your own discretion)
ETUDE HOUSE My Beauty Tool number 351 Eyebrow
CLIO Kill Brow Conte Powder Kit (the wax pomade only)
STEP NINE (OPTIONAL): Brush and set the eyebrow hairs into place using a mascara specifically for the eyebrows.
Since my hair is dyed an inch from the roots down, if I choose to wear my hair out, then I will match the eyebrow hairs to my actual hair color for balance. It usually looks odd if you have black or dark brown eyebrows with light colored hair, so I usually take a matching toned eyebrow mascara to not only set, but to tint the hairs themselves. If the pigmentation is a bit too strong, then I follow with a regular spooly to spread the mascara throughout, just to tone down the color.
I USED:
ISEHAN KISS ME Heavy Rotation Coloring Eyebrow in number 2 Orange Brown (I bent the brush on a 90° angle for ease of use. Whether you do this as well is to your own discretion)
STEP TEN: Apply a highlighter to the highest points of your face for extra dimension. This includes your cheekbones, chin, the nose bridge, forehead and cupids bow.
Again, just like the contouring, I tend to go a little bit too far with my highlight so I definitely need to be careful. Since my face is more on the neutral tone, depending on the base I choose to use, I will opt for a yellow tinged highlighter for a warmer look, a lavender or pink toned highlighter for a cooler look, or a neutral peach toned if I just can’t be bothered at all. Just like I mentioned in step 5, since I already applied highlighter beforehand, I don’t have to focus too much product using this powder type. Instead, I can lightly build up the intensity if need be, or skip this step altogether if I feel the highlighter is just enough.
I USED:
PONY EFFECT Magnetic Brush Pro number 102 Highlighter
SHISEIDO CLE DE PEAU Rehausseur D’Eclat number 16 Almond (I’m pretty sure this is available only in Japan, though there are some Shiseido stores around the world, now selling this range)
STEP ELEVEN: Apply blush to the cheeks to blend in with the contour for vibrancy to the complexion, and to add a bit of color to the skin.
Just as Tyra Banks would say, make the “OH REALLY THOUGH?” face when you apply your blush. You guys probably have no idea what I’m talking about when I’m saying this do you… If in doubt, just search up 6 minute Tyover on Youtube and you’ll find Tyra Banks promoting her makeup sticks, where she talks about the face she makes when applying blush. You’ll also see her apply blush on the apples of her cheeks, which is what I don’t really do.
Since my face is bright in the centre, I want to keep it bright, so rather than apply blush on the apples of my cheeks, when I make the “OH REALLY THOUGH?” face, I add the pigment on the hollow parts of my cheeks just above the contour and blend away, so there is a natural gradation between the shading and the blush. Whatever is left over on the brush, I apply to the bottom half of my nose bridge and blend outwards towards the cheek.
Of course, this does sound like hard work, and it really isn’t but if you’re lazy, just leave the blush on the apples of the cheeks and move right along.
I USED:
PONY EFFECT Magnetic Brush Pro number 103 Cheek and Contour
VDL x PANTONE Expert Color Cheek Book Mini in 6.4 shade 1 Pink (the blush edition that was released before the 2017 color of the year was picked, where the pantone colors were serenity and rose quartz)
STEP TWELVE: Apply mascara to the roots of the eyelash, and with whatever is left over on the wand, apply to the ends of the lashes to create natural volume and length.
For me only, since I don’t like to wear eyeliner (especially since I wear contacts AND have sensitive eyes at that) I only wear mascara to give the illusion of thick roots to get away with not applying an eyeliner. My natural eyelashes are long as well, so rather than looking for a lengthening product, I use any odd mascara that may add volume, but my main intentions are to just darken the lash hairs themselves.
I USED:
INNISFREE Skinny Waterproof Microcara Mascara (the formula is more dry, which is what I prefer. If you don’t like dry formulas then opt for the regular formulation which works incredibly well. The brush on this wand is extremely small so you can easily apply mascara to the upper AND bottom lashes)
STEP THIRTEEN: Finish off with a tint that compliments your skin tone and apply a light layer of gloss or lip balm to keep your lips hydrated throughout the day.
I hate reapplying my lip products, so with utter laziness, I always reach for lip tints that will stain my mouth for a good couple of hours, if not, the entire day. This means I can eat whenever I want with no dramas and no need for reapplication. Isn’t that the ultimate dream?
I USED:
MISSHA Velour Flat Pen Tint in Vivid Orange
THE HISTORY OF WHOO Secret Court Lip Balm
Since this post really isn’t a very professional one, and completely different to what I would usually share, it makes content like this so much more easier to just play around and type about whatever I really like. Of course, this doesn’t mean I’m steering away from what I usually produce here. It’s just nice to take time out once in a while and, you know, type like how I used to.
If you like this sort of content, then please let me know, so I can possibly do some more. If it’s not your taste, then feel free to leave your critiques as well, because any feedback (negative or positive) is good feedback in my opinion. Don’t forget to like and subscribe to this little blog so you know whenever I decide to shoot a post, and share with your friends and family if this material might pique their interests. As per usual, find me below on one of my SNS accounts.
Heaps of people were wondering what the hell I carry in my clutch, since it was always bulged and heavy. To answer this question, I decided to snap a quick photo and basically go through all the things I carry along in my daily life.
Now, it’s very obvious that I will carry my house keys (the little blue plush animal thing) and my wallet (the black one) with me if I were to go out. How else will I be able to return home, or do anything that involves cash? HAHAHAHA
Going from right to left:
Étude House My Beauty Tool blotting papers – I get very oily throughout the day in my T-zone so blotting is a must. I like this one in particular, as it comes in a compact with a mirror and a sponge with adhesive, which makes blotting sebum so much easier and more hygienic.
Oscar wireless headphones – Who can honestly be bothered with headphones that move around and literally get in your way, especially if you’re carrying a clutch? Wireless headphones means no dramas, and discreet listening PLUS this also doubles as a portable charger. Why not kill two birds with one stone?
Rohto Lycée Contact eye drops – It’s pink and it keeps my eyes moisturized without damaging my contacts. I’m not a huge fan of this product so if you have any recommendations, then please let me know because I’m definitely in need of good eye drops for contact wearers.
Kailijumei Flower Lipstick – If I feel like adding a pop of color to my lips, then I generally reach for this color changing balm for it’s moisturizing capabilities and long lasting wear. The case also has a small mirror which is convenient for travel and quick touch ups.
Estee Lauder Advanced Night Repair & La Mer Brightening Essence Intensive samples – Just in case my skin is lacking hydration, I carry whatever samples with me as a backup for hydration when touching up or as a booster when I have to leave the house without makeup.
The History of Whoo Luxury Golden Cushion – Again, I just carry whatever cushion with me, but this one generally comes along with my trips because I quite like the formula and the design of the case is great for show.
Crabtree & Evelyn Ultra Moisturizing Hand Therapy – I always have dry hands so I try to carry at least one hand cream around with me so I can maintain soft and smooth hands throughout the day. I also double this as a cream type perfume by applying a tiny bit of hand cream behind my ears for subtle fragrance.
Shiseido Cle De Peau Rouge Liquid Eclat – I have mine in shade 12, which is the ultimate nude shade for my lips. Literally the exact tone of my natural lips, which gives me that voluminous lip appearance without looking like it’s makeup.
Sulwhasoo Beauty Pouch – This little pouch contains a handheld mirror and a small metal comb; both very unnecessary and very extra. It feels luxurious though, and for the price ($45 AUD) why not carry it around with me for show? I guess it DOES have some practicality to it in the end, in case I need a mirror or a hair brush.
3CE Stylenanda Moist Glossing Face Oil Mist – Just like the beauty samples, if my skin feels lacking, then I’ll quickly spritz my face and go about my day. This formula not only makes my skin feel more hydrated, but it also gives my skin an impeccable dewiness that no amount of highlighter can achieve.
My Gummy candies – I usually bring whatever snack around in my bag, because I’m a fat ass and you highkey always see me eating something. Snacks generally vary depending on the amount of sleep I get; on days I’m lacking energy, I usually carry sweets with me, and days I’m normal, I carry savory foods.
The clutch is from Zara and cost $49.95 AUD. I bought mine in the navy blue shade, but other colors were available when I picked mine up. The simple design and color scheme of the navy blue clutch dresses up your simple clothing style (in my case, I generally wear black comfortable clothes) or adds a level of sophistication to your look.
Now that this post answers your question, my question to you is “what do YOU carry around in your bag?” If you enjoyed this post then don’t forget to like, subscribe and share with your friends and family. You can find my current SNS down below.
So Anthony goes from washing his face with powder, to exfoliating his skin with ACID? Yes, the infamous BHA Blackhead Power Liquid is finally in my hands, and it’s thanks to Style Story for sending it to my house, along with some other goodies. If you haven’t already read, I have typed up a post on the Tosowoong Enzyme Powder Wash and gave it a good rating based on how it works alone. (YOU SHOULD READ THAT POST AS WELL). Just like the powder wash, this BHA product is a huge favorite amongst the KBeauty junkies, is all over Instagram as a HG product and has pretty much taken the world by storm. Even a few of my friends who aren’t about the Korean skincare life, have sworn by this one bottle of liquid and has told me many times to hurry up and grab myself one. So now that I finally have, let’s take a look as to why every single person seems to have fallen in love with this damn product.
Keep in mind this writer has troublesome skin. Not only is the skin dehydrated with a combination skin type (oily in the t and dry in the u), he also suffers from acne and sensitivities around the mouth area.
****side note: this review is indeed sponsored and I will be providing a discount code for you guys, but as any other review I make in this blog, all comments are made up of my own thoughts and feelings and in no way am I changing up anything to glorify or bash this product to see fit, unless that is truly how I feel. I also want to note that being a sponsored post, I will NOT be making any profits from any sales towards any of these products. If you feel uncomfortable making a purchase from this post, then feel free to shop elsewhere. Otherwise, the complementary code I will be giving you guys are free for your use. OK ONTO THE REVIEW!
What is COSRX BHA Blackhead Power Liquid?
An oil-soluble acid exfoliant the can clear the dead skin cells deep within the pores to minimize the appearance of enlarged pores and prevent break outs. With a light watery texture, it works with your skin to soften and improve over time, to provide a flawless, blemish free and brighter skin tone.
Unlike the majority of BHA products in the market, COSRX uses betaine salicylate as the main ingredient opposed to the more generic and more common, salicylic acid. This means that it is ideal for those who suffer from acne, as it can help to fight the signs of acne production before it occurs, and also helps to treat the pre-existing acne on your skin. It also contains willow bark water as the main ingredient unlike other branded products that use the generic “aqua” as their moisture ingredient. The BHA Blackhead Liquid can also help oily skin types to control the amount of sebum produced on the skin.
Being that it gently exfoliates your skin and helps to deep cleanse the pores at the same time, you can use the COSRX BHA Blackhead Power Liquid everyday, opposed to your physical/chemical scrubs that you can only use once or twice a week. It is also balanced with a pH of 4, to protect your acid mantle whilst providing you with a deep clean for the perfect skin texture and appearance.
This product judging by the description, tackles everything I need in life. Not only does it work to minimize the pores, but it also helps to keep the pores clean from impurities or blockages, in turn helping those who suffer from excess sebum production. It also helps to control and fight off signs of acne, whilst gently peeling away the dead skin for a more softer and brighter skin tone. Overall, the claims offer you less oil, better pores, no pimples, brighter skin AND improved skin texture all in one. Now I must say, who wouldn’t want that? BHA, being an acid type, obviously needs a pH low enough to function properly, so it’s nice to see that this product sits at a pH of 4, which is slightly acidic to work well with your skin. Each bottle comes with 100mL of product, which is the standard for most road store branded toners and exfoliants.
On that note, let’s take a look at the ingredients and see how well this little list fairs against our skin.
Ingredients listed in bold have an acne reading of 1, and ingredients highlighted have a safety reading of 3. Since safety only measures the impact of how an ingredient will affect your skin with prolonged use over a VERY long duration of time, I don’t think it’s something really worthy of mentioning, considering so many other external factors are more likely to cause you harm than something that appears at the end of an ingredients list. Butylene Glycol, as I’ve mentioned in so many of my blogs, has an acne reading of 1 and acts as a solvent and moisturizer. This ingredient basically helps to prevent your skin from drying out, and is vital in a product like this BHA Power Liquid, since BHA tends to dry your skin out. I’d say the alarm is there only for those who suffer extreme cases of acne and may be alarmed by ingredients that show even the slightest probability of acne induction. As for normal people who usually don’t express acne, or someone like me who has only minor to moderate acne occasionally, this isn’t something to be wary about.
I’d say overall, the ingredients list is pretty darn good, and it’s nice to see there aren’t any artificial preservatives or artificial fragrances added to this product. I’d dare say that even a sensitive skin type person may be able to use this based on the ingredients list alone. COSRX uses 4% betain salicylate in the ingredients, which I personally find high, compared to other brands who use roughly 1 or 2% salicylic acid, so keep that in mind. Betaine salicylate is actually more gentler on the skin than salicylic acid is, which also makes it more easier to use for those with sensitive skin types. Also, note the first ingredient isn’t “water” or “aqua” but instead, it’s willow bark water. If you didn’t know, willow bark water has slight BHA properties in it as well, though compared to betaine salicylate, it isn’t worth the mention, other than the fact it replaces general water which usually ends up being a filler ingredient in most cosmetics.
DO NOT USE if you are allergic to betaine salicylate, or the other ingredients in the list. You also shouldn’t use if you incorporate any products that include retinoid (vitamin A) or vitamin C products as this will cause your skin to have severe irritations and backlash, and it’ll decrease the effects of both the vitamins and this BHA. Another note, if you’re allergic to aspirin, then I strongly suggest you visit a doctor or patch test before making a purchase of this product.
Unfortunately the camera couldn’t pick up on the liquid content inside the bottle, since the liquid is virtually clear toned as well. So far within the time of me trying out this product, I have used a little over half way down the black label (somewhere in between Power and Liquid).
For the packaging, the bottle is sleek; it’s see through and labelled black, with a clear cap and a black pump dispenser. Nothing screams out to me with the design, but being that COSRX is on the affordable side of the Korean skincare world, it doesn’t look nor feel cheap. The bottle itself is a sturdy plastic, meaning that if you’re a clutz like I am, you’re not going to damage the bottle if you accidentally drop it on the floor. Since the bottle is clear, you have a good indication as to when your liquid is running low, which is probably the best part of the whole design in my opinion.
As for the actual product inside, the liquid is clear and has the viscosity of water, only slightly thicker. It feels a tad oily upon application but absorbs almost immediately into the skin and leaves a sleek, but soft skin texture that isn’t too sticky, nor too dry. There is a very slight chemically scent present, but dissipates within minutes after application, and didn’t really bother me. I wouldn’t have noticed either way if I wasn’t sticking my nose into the liquid. I didn’t notice any irritations on my skin at all, unless I were to be too rough with my daily face shave and cause micro tears in the skin. Even then, the pain only lasts a few seconds before it completely disappears. The directions specifically state to apply with a cotton and as if you’re cleaning your skin, wipe against the skin texture in your toner/essence stage of skin care, and avoid the delicate eye areas. After application, be sure to use sunblock. I’ve read other reviews on this product, and the majority of people have also stated to use cotton pads, only if your hands start to peel; since this product is designed to remove dead skin. I’ve trialled this product for nearly a month now, and I’ve yet to see my hands shed, so I guess it depends on your skin and how your skin can tolerate it.
When I apply the BHA liquid, I generally tone first using a cleansing toner of some sort, otherwise I apply directly onto my skin right after washing. Using a cotton pad, I take a few pumps and I work my way up from my neck, then take another pump directly onto the finger tips and massage into my nose and porous areas of the skin. I then allow the product to work it’s magic in the space of a half hour wait. In this time, I generally sit around, watch a bit of Youtube or have a mug of coffee. The waiting game is the hardest part for me. The reason being, is that you need enough time for the product to fully absorb into the skin for the exfoliating to be at it’s most optimal, otherwise you run the risk of the product not working to it’s full potential, thus causing your skin to reject by producing blackheads or acne. After half an hour, I just go about my regular skin routine, making sure to have some form of SPF coverage, as BHA can cause your skin to sensitize, especially in direct sunlight.
Now, if you’ve been reading my blog posts for a while, then you’d know that I’ve always mentioned that my pores have been small and I’ve never really had any trouble with blackheads whatsoever. Well, ever since using this product, I can now apologize to you all because, this bottle of liquid magic has tightened my pores even more than I could ever imagine, and has kept my skin so clean that I am most probably going to revise my entire outlook in life. This means that I can stop my Meiji Collagen intake since this BHA liquid can do everything the Meiji did for me, without the expense of $50 AUD per month. I could probably even replace my HG essences with this one product. (GOODBYE MISSHA FTE). On top of that, using for nearly a month, twice a day (surprised my skin could even tolerate it) has only reduced the amount of liquid by a teeny tiny bit, so I can verify that this bottle will last you a very long time.
Most reviews I’ve read on “cult favorite BHA products” found in the Western market often state that they dry your skin out like no tomorrow. I was half expecting it to be the same with this COSRX product, or at a level comparable to Clinique’s skincare products, but I was surprised to find that my skin never felt dry, but at the same time, my sebum levels in the skin actually reduced by a ten-fold throughout the day. I am even inclined to say that my excessive oily t-zone is slightly shifting to a more normal to oily skin type.
I’ve taken 3 tests to check my skin condition prior to using the Power Liquid to give you guys an average indication of what state my skin was. The average water content in my skin was 50.9% and sebum at 22.8%. Overall, my skin was well balanced.After application, I retook the test 3 times. On average, my skin had a water content of 51.4% and a sebum reading of 23.1%. That means, my skin increased in moisture by 0.5% and sebum by 0.3%. Overall, my skin stayed well balanced.
For price, one bottle at Style Story costs about $21.95 AUD, which, just like the Tosowoong Cleanser, is by far the cheapest toner/essence/exfoliator (whichever you want to categorize this product as, that is), I have used in my entire life. The cheapest toner I have had to date has cost me $22 AUD, the cheapest essence at $48 and the cheapest exfoliator at a hefty $55 AUD. Of course, the COSRX BHA Blackhead Power Liquid wins, and quite frankly, the effectiveness of this product compared to the three I mentioned put together, shits all over them all. Why wouldn’t you want to get your hands on this?
An extra bonus for you guys; if you shop at Style Story and use the coupon code ANTHONY15, then you can drop the price even more by 15%, which then makes the price sit at $18.65.
PROS:
pH balanced at 4 on the pH scale, to work with your acid mantle barrier and your skin.
100mL is a pretty decent amount per bottle
Being a BHA, it isn’t drying on the skin whatsoever, and only caused me irritations if I shave too carelessly on the day.
Slight smell that disappears really quickly.
Lasts quite a long time.
Makes skin really smooth, fights acne pretty well, brightens face complexion, clears pores from blackheads and tightens pores.
Very good ingredients list. The only concern was butylene glycol with an acne trigger of 1, which isn’t too bad as it’s more likely going to impact on the hydration levels of your skin more than it clogging your pores or aggravating acne.
There is no water/aqua in the ingredients list; it is replaced with willow bark water which has slight BHA properties to it, which is fitting for this product.
CHEAP AS HELL
CONS:
Being a BHA, you have to wait 20 to 30 minutes for the product to work at is optimal state before continuing with the rest of your skincare.
Since you’re supposed to wear SPF every single day anyway, it’s not really a con, but you’re encouraged to wear SPF daily since BHA can make your skin more sensitized to UV rays and sun damage.
★☆☆☆☆ – I want all my time wasted and all my money back for this crap. If I could turn back time and tell my past self not to use this, then I would without a single doubt. If I find this in my collection or if someone gave it to me, I’ll set it on fire and pray to the All Maker to repent for using such a terrible product.
★★☆☆☆ – It’s pretty bad and I definitely wouldn’t recommend this to anybody, but it’s nice to give it a go for myself. I’ll only use it if it was given to me for free and I’m severely desperate.
★★★☆☆ – It’s nice but I wouldn’t go out of my way to get another one for myself. Maybe if it was on special then I’d consider buying it, otherwise there are better products that I like a lot more than this.
★★★★☆ – It’s quite good and I would repurchase definitely. It’s not a staple yet, but if I can’t find anything better, then I’ll happily stick to this product.
★★★★★ – OH MY GOD GET YOUR HANDS ON THIS BECAUSE IT IS A LIFE SAVER AND WORTH EVERY SINGLE PENNY EVEN IF YOU BECOME POOR BECAUSE OF IT OMG
Now that you know what the stars mean, you can figure out what I mean by my personal ratings.
VERDICT: For me to turn around and say that I did notice a change in my pores, and the cleanliness of my pores went from what I thought to be extremely clean, to unbelievable changes, this definitely can’t receive a rating other than HG. There really isn’t anything else I can say other than for you all to go and purchase it online for yourselves before it’s sold out in every single retail store near you AND online.
Have you been sleeping on BHA products? Are you now intrigued by them and want to give them a shot? Or maybe you’ve used this product before, or have a different BHA that you’ve totally fallen in love with. Let me know down in the comments below what you think of the BHA Blackhead Power Liquid by COSRX. DOn’t forget to like this review, share with your friends and family and don’t forget to add my SNS sites down below for extra content and everyday life.
Wait… Washing your face with powder? That’s right! Washing your face with powder isn’t a new thing for us Asian beauty lovers, but for some, it’s out of this world. I’m talking the infamous Tosowoong Enzyme Powder Wash, which I’m definitely sure you guys have heard of multiple times. It’s not only a cult product in the blogging world, but in the Asian beauty world as well, and I can definitely see why so many people love it so. However, keep in mind that this writer has very troublesome skin. I suffer from a combination/dehydrated skin type (oily in the T and dry in the U), is prone to acne and has sensitivity generally around the nose and chin. How will a powdered wash that closely resembles something you use in your laundry, work for my troublesome skin? Keep on reading to find out.
****side note: this review is indeed sponsored and I will be providing a discount code for you guys, but as any other review I make in this blog, all comments are made up of my own thoughts and feelings and in no way am I changing up anything to glorify or bash this product to see fit, unless that is truly how I feel. I also want to note that being a sponsored post, I will NOT be making any profits from any sales towards any of these products. If you feel uncomfortable making a purchase from this post, then feel free to shop elsewhere. Otherwise, the complementary code I will be giving you guys are free for your use. OK ONTO THE REVIEW!
What is Tosowoong Enzyme Powder Wash?
A powerful powder-to-foaming cleanser that washes away deep-seated dirt and impurities, revealing clearer, more moisturized skin. Enriched with Vitamin E, it also leaves skin feeling soft and fresh with a flawless finish.
Free from silicones, alcohol, formaldehyde, coal tar, talc, mineral oil, peg, phthalates, formaldehyde-releasers, dye, mit, parabens, tea, triclosan, propylene glycol AND has a ph level of 5.5, it’ll keep your skin soft, moisturized and balanced.
Not only are the claims impressive, the powder comes in a whopping 70g worth of product. I don’t know about you, but compared to other cleansers, you’re looking at a very LARGE amount and a lot of uses. A pH level of 5.5 means that it is well balanced for virtually all skin types and will work well to not only cleanse the skin, but protect the acid mantle from any damages. The description strongly emphasizes that it is free from so many bad ingredients, which gives you the impression that the cleanser will be packed with only good right? Let’s examine the ingredients list now.
OK so this list of ingredients, I can say isn’t the best mix for your skin. The ingredients that are in BOLD writing have an acne/irritation alarm, and ingredients HIGHLIGHTED in color show a safety rating alarm. Sodium Lauryl Sulfate (SLS) according to COSDNA, has an acne rating of 5, which raises alarms for my skin since I am very prone to small bumps and pimples. Papain shows an irritation level between 0 to 3 and Alcohol Denat show an irritation level of 5. The ingredients in the light orange have a safety reading of 3 whereas those in the dark orange have a rating of 4. Now, with safety, it only raises an alarm as there is a possible chance there might be skin damages from using these ingredients, and basically comes to how your skin tolerates them, and of course, personal discretion.
I’m a little upset that this wash contains titanium dioxide, as this ingredient is commonly used in physical sunblock to protect the skin from UV rays and isn’t the most kindest to the skin if left there. Also, there seems to be an equal amount of “safe” ingredients to those that raises some sort of alarm, which is a bit disappointing. HOWEVER, and I want to strongly emphasize that, though the ingredients list seems absolutely shit, we have to remember that some of these ingredients (Sodium Lauryl Sulfate and Alcohol Denat in particular) work by stripping the skin IF the cleanser is sitting at a pH too high for our acid mantle to tolerate. With a pH of 5.5, these “nasty” ingredients aren’t as effective as they are made out to be and instead, are more likely to work only as a solvent or surfactant to clean the skin.
That said, I’d only really advise someone to not use this product if your skin literally can not tolerate SLS, alcohol denat and the other various ingredients. If your main concern for avoiding using this cleanser because the ingredients are stripping of moisture, then you have nothing to worry about.
Over to the packaging now, the bottle is quite large and made of sturdy plastic. The nozzle where the powder comes out from is covered with a blocker, to prevent powder from pouring out everywhere, and can be discarded if you like (which is what I did). Utilizing a flip top cap, you can protect the powder from contact with water to prevent product wastage. The actual opening for the powder is positioned in the middle, which is so convenient because it means only the powder in the cap comes out from the opening and not the entire powder. You can seriously control how much actually comes out from the bottle that way. Though, I find the packaging really nice, the only downfall is that you can’t see how much powder you have left inside, unless you give it a shake and judge from the sound/weight of the bottle. Everything else seems really good. Oh, people have mentioned that the wash is travel friendly because it comes in dry form, and I’d like to say that it is, though compared to the Suisai powder wash from Kanebo, yeah I think you’d all agree that the Tosowoong in comparison to that brand, Kanebo wins. Nonetheless, carrying your Tosowoong in your luggage bag isn’t going to cause you trouble at all.
The spout tip allows the powder to come out freely into the cap part of the packaging, whilst the dish carries all the powder that has been shaken out from the spout. If you kept your nozzle blocker, then you can remove and attach as needed, and is a useful addition to the design of this packaging that allows the product to be travel friendly.The cap is a screw on which makes it really easy to adjust and open the product for the first time. This also means that the cap will be secure in place and you won’t be accidentally spilling all your product everywhere.If you look at the opening, it sort of resembles a smiley face mouth shape.So of course, I had to edit in some eyes.
For the actual product itself, the powder seriously looks like something you’d use in your laundry. No joke, even the granules feel like it and smell so as well. Don’t mistake this for laundry powder! I usually take a small amount (and by small, I mean slightly less that the portion you get with the Suisai powder, which is roughly 0.4g) into my hands and add a few drops of water to form a lather. Whipping the powder into the water creates a thick marshmallow like foam that you can apply to your damp skin and cleanse like usual. Another alternative to using this powder is to leave a few teeny tiny granules in your foam and work it into the skin like an exfoliating scrub to remove the excess dead skin cells sitting on the surface of the skin. Either way, the foam very gently cleanses your face and gives you micro exfoliation each and every time you use it. This also means you’re gently exfoliating your skin twice a day, if you choose to use the Tosowoong wash morning and night.
The granules feel very solid when in dry form and strongly resembles laundry powder on texture, size and scent.When adding water, you only need a tiny amount to just dampen the soil to create your foam. It’s up to you whether you want to completely dissolve the powder into a foam, or leave a few granules in solid form to act as a foam type physical scrub.
Rinsing the face, I can immediately tell my skin becomes more brightened and so much more smoother in texture, and the most important, NOWHERE near dry. My skin is as soft and well nourished as ever, and I actually think I’ve found myself a new HG cleanser. I’m yet to experience an irritation, nor have I broken out from using it thus far. Most people usually use and review skincare after a month of trial, but I can already say that I am beyond impressed with this little powder using it in such a short time. I want to note that it works exceptionally well as a day cleanser, but as a night cleanser, it is gentle and though it actually cleanses your skin very well, I would prefer something a little more “heavy duty” feeling IF I am wearing heavy makeup on that day. For days like that, I would opt for my April Skin Magic Stone in grey, which you can read a review on here.
This might be a little bit unnecessary but I wanted to measure out my skin before washing my face. Since I wanted to be a little bit more accurate, I took three tests before washing my face to give you an average score on the condition of my skin. Prior to washing, my skin had an average water content of 33.6% and an average sebum content of 15.1%. Overall, the skin was imbalanced.Just like the previous test, I once again took three tests to give you an average score reading of my skin after washing my face. On average, my skin had a water content of 56.8% and a sebum reading of 25.5%. That means my skin increased in moisture levels by 23.2% and sebum by 10.4%. Overall, the skin is balanced.
The price of this is incredibly cheap. Let’s go back to the Suisai powder again for comparison. For 15 pieces of Suisai, it can cost you around $20 AUD and for a 32 piece pack, you’re looking at $35. Usage for the Suisai is strict, in the sense that one individually wrapped piece can only be used one time, so 32 pieces will only last you 16 days AT MAX. The Tosowoong Enzyme Powder Wash on the other hand? One bottle is $15.95 and shopping with Style Story, you can get three bottles, where the 3rd bottle is half price, sitting at $23.90. If we do a little bit of maths here, then three bottles of the Tosowoong sits at $55.80 AUD. If you want to get the Suisai powder for a similar price, then you’re looking at buying one pack of 32 pieces, and one pack of 15 pieces. That gives you a total of $52 spent, and only a measly 47 washes, whereas the Tosowoong can easily exceed 3 months per bottle, and on average, 9 months with 3 bottles? If that isn’t a bargain than I don’t know what is.
If that isn’t clear enough for you, then the cheapest ASIAN beauty face cleanser I have ever used in my life (ETUDE HOUSE BAKING POWDER SOMETHING WASH THING), sits at $18 AUD and lasts the same amount of time of usage, and frankly the Tosowoong is even cheaper than that. If you really wanted to, you could even stretch the powder distribution out to your own discretion and get even more uses out of it than the 3 months.
An extra bonus for you guys; if you shop at Style Story and use the coupon code ANTHONY15, then you can drop the price even more by 15%, which then makes the price sit at $13.55.
PROS:
pH balanced at 5.5, which is perfect for your skin.
Dry formula means you can transform a foam cleanser to a foam exfoliant with ease. The fact that the standout ingredient is Papaya, the cleanser naturally exfoliates your skin when used normally anyway.
Dry formula also means that it is fairly travel friendly and won’t cause you too much of a problem. If you’re comparing it to the Suisai however, then you will be disappointed, but otherwise, it’s really good in that aspect.
Gives your skin a strong brightening effect without stripping it from moisture or giving you that tight squeaky feeling.
So incredibly cheap, even without my special discount code you can use at Style Story. For a cleanser to sit at only $15.95 per bottle and $55.80 for three, it’s by far the most cheapest cleanser I’ve seen in the AB buyers market, in forever.
Gave me no irritations whatsoever, and didn’t break me out.
Gives me washing powder nostalgia; I love the scent of laundry detergents, and I love sniffing laundry so I instantly fell in love with this fragrance. Probably might be a con for you guys.
CONS:
Ingredients list will definitely raise eyebrows, but it’s not going to affect the final outcome of usage. You still will get really nice skin that feels soft, bouncy and looks refreshed and brighter.
I’d actually say it works exceptionally well as a day cleanser, but for heavy makeup users, I would prefer something a little more heavy duty. Don’t get this wrong though, because this DOES clean your pores after makeup very well; I think it’s more just my personal preference.
BECAME MY HOLY GRAIL CLEANSER AND IT’S SO CHEAP I’M BEGINNING TO QUESTION EVERYTHING IN LIFE
★☆☆☆☆ – I want all my time wasted and all my money back for this crap. If I could turn back time and tell my past self not to use this, then I would without a single doubt. If I find this in my collection or if someone gave it to me, I’ll set it on fire and pray to the All Maker to repent for using such a terrible product.
★★☆☆☆ – It’s pretty bad and I definitely wouldn’t recommend this to anybody, but it’s nice to give it a go for myself. I’ll only use it if it was given to me for free and I’m severely desperate.
★★★☆☆ – It’s nice but I wouldn’t go out of my way to get another one for myself. Maybe if it was on special then I’d consider buying it, otherwise there are better products that I like a lot more than this.
★★★★☆ – It’s quite good and I would repurchase definitely. It’s not a staple yet, but if I can’t find anything better, then I’ll happily stick to this product.
★★★★★ – OH MY GOD GET YOUR HANDS ON THIS BECAUSE IT IS A LIFE SAVER AND WORTH EVERY SINGLE PENNY EVEN IF YOU BECOME POOR BECAUSE OF IT OMG
Now that you know what the stars mean, you can figure out what I mean by my personal ratings.
VERDICT: It’s HG. Need I really say more? The Tosowoong Enzyme Powder Wash is perfect for day time use, and even night use. Though it doesn’t feel like your skin is clean from anything after washing your face with this, visible results will definitely speak for itself. I can’t believe I have been sleeping on this product for so damn long!
Have you used the Tosowoong Enzyme Powder before? What are your thoughts on it? Looking to make a purchase after reading this post? Let me know how you’re going as well, because I’d love to hear your experiences too. Is powder your thing, or is it a weird experience that you’re not budging to try? Don’t forget to check out Style Story and browse their online store, because they’re offering 15% off purchases using ANTHONY15 as the discount code. Don’t forget to like this post if you found it interesting, share with your friends and family, and stay tuned for the next blog update.